| [Címoldal][Tartalom][Tárgymutató][ ? ] |
LilyPond — Tankönyv
|
Ez a tankönyv a LilyPond 2.13.45 verziójába nyújt bevezetést. |
| 1. Első lecke | A LilyPond használatának alapjai. | |
| 2. Elemi kottaírás | Kották lejegyzése a leggyakoribb kottaelemek felhasználásával. | |
| 3. Alapfogalmak | Alapvető fogalmak, melyek a továbbiak megértéséhez szükségesek. | |
| 4. A kimenet finomhangolása | Bevezetés a kottakép finomhangolásába. | |
Függelék | ||
|---|---|---|
| A. Sablonok | Előre elkészített sablonok. | |
| B. GNU Free Documentation License | E dokumentum licence. | |
| C. LilyPond tárgymutató | ||
|
A teljes dokumentáció a http://www.lilypond.org/ honlapon található. |
| [ << Top ] | [Címoldal][Tartalom][Tárgymutató][ ? ] | [ Elemi kottaírás >> ] | ||
| [ < Top ] | [ Fel: Top ] | [ Fájlok fordítása > ] | ||
1. Első lecke
Tankönyvünk első leckéje bemutatja a LilyPond nyelvét, és elmagyarázza, hogyan kell nyomtatható kottát előállítani.
| 1.1 Fájlok fordítása | ||
| 1.2 Bemeneti fájlok írása | ||
| 1.3 Hogyan olvassuk a dokumentációt? |
| [ << Első lecke ] | [Címoldal][Tartalom][Tárgymutató][ ? ] | [ Elemi kottaírás >> ] | ||
| [ < Első lecke ] | [ Fel: Első lecke ] | [ Zene bevitele > ] | ||
1.1 Fájlok fordítása
| 1.1.1 Zene bevitele | ||
| 1.1.2 Mac OS X | ||
| 1.1.3 Windows | ||
| 1.1.4 Parancssor |
| [ << Első lecke ] | [Címoldal][Tartalom][Tárgymutató][ ? ] | [ Elemi kottaírás >> ] | ||
| [ < Fájlok fordítása ] | [ Fel: Fájlok fordítása ] | [ Mac OS X > ] | ||
1.1.1 Zene bevitele
A LilyPond bemeneti fájljai egyszerű szöveges állományok. Egy kotta létrehozásához egy bemeneti fájlban (másnéven forrásfájlban) kell azt szöveges formában leírni. „Fordítás” a neve annak a folyamatnak, melynek során egy LilyPond formátumú forrásfájlból egy nyomtatható kotta és (szabadon választhatóan) egy meghallgatható MIDI fájl áll elő.
Első példánk megmutatja, hogy néz ki egy egyszerű bemenet. A LilyPond forrásfájlba ezt írva:
{
  c' e' g' e'
}
az alábbi eredményt kapjuk:
Figyelem: A LilyPondban a hangok és a dalszöveg köré mindig { kapcsos zárójeleket } kell írni. A kapcsos zárójeleket legtöbbször szóközzel vesszük körül, hacsak a sor elején vagy végén nem állnak, hogy környezetükkel ne folyjanak egybe, így kétértelműséget okozván. A tankönyv példáiban olykor a rövidség kedvéért elhagyjuk a kapcsos zárójeleket, de a forrásfájlokban nem szabad elfelejteni kitenni őket! A Hogyan olvassuk a dokumentációt? c. fejezetben olvasható több információ a tankönyv példáiról és megjelenítésük módjáról.
Továbbá a LilyPond bemenete érzékeny a kis- és nagybetűk különbségére:
{ c d e } érvényes bemenet; { C D E } hibát
eredményez.
A kimenet megtekintése
Ez a szakasz arról szól, hogy milyen parancsokat kell futtatni a kotta előállításához és a kimenet megtekintéséhez a felhasználó operációs rendszerétől függően.
Bizonyos szövegszerkesztőkbe beépíthető LilyPond támogatás, ami hatékonyabb szerkesztést tesz lehetővé; erről a Text editor support c. fejezet ír.
Figyelem: Amikor a LilyPond első alkalommal fut, egy-két percig várni kell, amíg megvizsgálja a rendszer betűtípusait. Ezután természetesen sokkal gyorsabban fog futni!
| [ << Első lecke ] | [Címoldal][Tartalom][Tárgymutató][ ? ] | [ Elemi kottaírás >> ] | ||
| [ < Zene bevitele ] | [ Fel: Fájlok fordítása ] | [ Windows > ] | ||
1.1.2 Mac OS X
Ha elindítjuk a LilyPond.app alkalmazást, egy példaállományt látunk
megnyitva. Mentsük el (pl. ‘test.ly’ néven az Asztalra), majd a
„Compile > Typeset File” (‘Fordítás > Kotta szedése’) menüpont segítségével fordítsuk le.
Ezután az eredményül kapott PDF fájl a képernyőn látható.
A következő parancsok, melyekre szükség lehet, a „New” (‘Új’) és az „Open” (‘Megnyitás’) a „File” (‘Fájl’) menüben. A szerkesztés alatt levő fájlt a szedés előtt mindig el kell menteni. Ha a feldolgozás során bármilyen hiba történt, a naplóablakban láthatjuk a hibák leírását.
| [ << Első lecke ] | [Címoldal][Tartalom][Tárgymutató][ ? ] | [ Elemi kottaírás >> ] | ||
| [ < Mac OS X ] | [ Fel: Fájlok fordítása ] | [ Parancssor > ] | ||
1.1.3 Windows
Windows alatt az Asztalon levő LilyPond ikonra duplán kattintva indíthatjuk el a LilyPondot, mely először egy példafájlt nyit meg egy egyszerű szövegszerkesztőben. Mentsük el (pl. ‘test.ly’ néven az Asztalra), majd kattintsunk rá duplán a lefordításához (az ikonja egy hangjegyre hasonlít). Pár másodperc múlva létrejön egy ‘test.pdf’ nevű fájl az Asztalon. Ha erre duplán kattintunk, megtekinthetjük a nyomtatható kottát. A ‘test.ly’ fordításának másik módja, hogy egérrel ráhúzzuk a LilyPond parancsikonjára.
Egy létező ‘.ly’ fájl szerkesztéséhez kattintsunk rá jobb gombbal, és válasszuk az „Edit source” (‘Forrás szerkesztése’) menüpontot. Új kotta írásához vagy a szerkesztőt futtassuk a fent leírt módon, majd válasszuk ki a „File > New” (‘Fájl > Új’) parancsot, vagy jobb gombbal kattintsunk az Asztalra, válasszuk az ‘Új > Szöveges dokumentum’ menüpontot, nevezzük át a fájlt a kívánt névre, és változtassuk meg a kiterjesztését ‘.ly’-re. Ezután ugyanúgy szerkeszthetjük és feldolgozhatjuk, ahogy eddig is tettük.
Ha duplán kattintunk egy .ly fájlra, nem csak egy PDF-et kapunk, hanem
egy .log kiterjesztésű naplófájlt is, amely a LilyPond futásáról
tartalmaz információkat. Hiba esetén ajánlatos megvizsgálni.
| [ << Első lecke ] | [Címoldal][Tartalom][Tárgymutató][ ? ] | [ Elemi kottaírás >> ] | ||
| [ < Windows ] | [ Fel: Fájlok fordítása ] | [ Bemeneti fájlok írása > ] | ||
1.1.4 Parancssor
Hozzunk létre egy fájlt ‘test.ly’ néven, és írjuk bele a következőket:
{
  c' e' g' e'
}
A ‘test.ly’ fájl feldolgozásához adjuk ki az alábbi parancsot:
lilypond test.ly
Ekkor az alábbi kimenethez hasonlót láthatunk:
lilypond test.ly
GNU LilyPond 2.13.45
Processing `test.ly'
Parsing...
Interpreting music...
Preprocessing graphical objects...
Finding the ideal number of pages...
Fitting music on 1 page...
Drawing systems...
Layout output to `test.ps'...
Converting to `test.pdf'...
| [ << Első lecke ] | [Címoldal][Tartalom][Tárgymutató][ ? ] | [ Elemi kottaírás >> ] | ||
| [ < Parancssor ] | [ Fel: Első lecke ] | [ Egyszerű kottázás > ] | ||
1.2 Bemeneti fájlok írása
| 1.2.1 Egyszerű kottázás | ||
| 1.2.2 A bemeneti fájlok jellemzői |
| [ << Első lecke ] | [Címoldal][Tartalom][Tárgymutató][ ? ] | [ Elemi kottaírás >> ] | ||
| [ < Bemeneti fájlok írása ] | [ Fel: Bemeneti fájlok írása ] | [ A bemeneti fájlok jellemzői > ] | ||
1.2.1 Egyszerű kottázás
A LilyPond bizonyos elemeket automatikusan hozzáad a kottához. A következő példában csak négy hangmagasságot adunk meg, de a LilyPond kirakja a kulcsot és az ütemmutatót, valamint a hangok hosszúságát alapértelmezetten negyednek veszi.
{
  c' e' g' e'
}
![[image of music]](0e/lily-65961d18.png)
Természetesen minden megváltoztatható, de a legtöbb esetben az alapbeállítás megfelelő.
Hangmagasság
Fogalomtár: pitch, interval, scale, middle C, octave, accidental.
A hangok beírásának legegyszerűbb módja a \relative mód.
Ebben a módban minden hang automatikusan abba az oktávba kerül,
melyben az előző hanghoz a legközelebb áll, vagyis legfeljebb
kvárt távolságra. Ennek szemléltetésére gépeljünk be egy zenei alapformulát,
egy skálát, melyben minden hang szekund távolságra van az
előzőtől. (Figyelem: mivel angolul a h hang neve b, ezért a LilyPond forrásban
is mindig b-t kell írni h helyett!)
% megadjuk, hogy az első viszonyítási hang egyvonalas c legyen
\relative c' {
  c d e f
  g a b c
}
![[image of music]](3f/lily-079c3761.png)
Itt a relatív mód első viszonyítási hangja az egyvonalas c. Minden
hang az előzőhöz a lehető legközelebb helyezkedik el: az első c az
egyvonalas c-hez legközelebb eső c hangot jelenti, vagyis az egyvonalas c-t.
A második, d hang ehhez a hanghoz esik legközelebb, vagyis ugyanúgy az
egyvonalas oktávba kerül.
Legfeljebb kvárt nagyságú hangközöket tartalmazó dallamok tápláhatók be így a
legegyszerűbben.
\relative c' {
  d f a g
  c b f d
}
![[image of music]](b3/lily-742db23d.png)
Természetesen nem szükséges, hogy a relatív mód első viszonyítási hangja
megegyezzen a tényleges első hanggal, ahogy az előző példában is láttuk, ahol
az első hang – a d – az egyvonalas c-hez legközelebb eső hang,
az egyvonalas d.
A \relative c' { parancsban megadott első viszonyítási hanghoz
' vagy , karaktereket hozzáadva vagy elvéve
változtatható a kezdőoktáv:
% kétvonalas oktáv
\relative c'' {
  e c a c
}
![[image of music]](55/lily-e59c7426.png)
A relatív mód kezdetben bonyolultnak tűnhet, de valójában a legtöbb dallamot így lehet legkönnyebben bevinni. Nézzük, hogyan néz ki a relatív hangmagasság-számítás a gyakorlatban. A h hangról egy kvárton belül felfelé a c, d és e hangok helyezkednek el, míg lefelé az a, g és f hangok. Tehát ha egy h-t követő hang c, d vagy e, akkor a h fölé, míg ha a, g vagy f, akkor a h alá kerül.
\relative c'' {
  b c  % felfelé szekund, lefelé szeptim, így: felső c
  b d  % felfelé terc, lefelé szext, így: felső d
  b e  % felfelé kvárt, lefelé kvint, így: felső e
  b a  % felfelé szeptim, lefelé szekund, így: alsó a
  b g  % felfelé szext, lefelé terc, így: alsó g
  b f  % felfelé kvint, lefelé kvárt, így: alsó f
}
![[image of music]](f0/lily-9e92bcee.png)
Pontosan ugyanez marad a működés, ha bármelyik hang előtt kereszt vagy bé áll. A módosítójelek a relatív magasságszámítás során egyáltalán nem számítanak. A számítás során csak a vonalrendszerben elfoglalt pozíciónak (azaz a diatonikus magasságnak) van szerepe.
Kvártnál nagyobb hangközugrást úgy érhetünk el, hogy ' vagy ,
karaktereket helyezünk a hang után. Az ' egy oktávnyi
emelkedést, a , egy oktávnyi süllyedést jelent.
\relative c'' {
  a a, c' f,
  g g'' a,, f'
}
![[image of music]](06/lily-57908349.png)
Amennyi karaktert használunk, annyi oktáv különbséget érhetünk el, pl.
'' vagy ,, két oktávnyi emelést, ill. süllyesztést jelent –
de vigyázzunk, soha ne használjunk idézőjelet (") két aposztróf
('') helyett! Ez ugyanaz a mechanizmus, amivel a relatív mód első
viszonyítási hangját módosíthatjuk.
Ritmusérték
Fogalomtár: beam, duration, whole note, half note, quarter note, dotted note.
A hangok ritmusértékét a hangmagasság után írt számmal
határozhatjuk meg. 1 jelenti az egészkottát, 2 a
félkottát, 4 a negyedkottát és így tovább. A
gerendázást automatikusan elvégzi a LilyPond.
Ha nincs megadva a hosszúság, az előző hang hossza marad érvényben. Az első hang alapértelmezetten negyed hosszúságú.
\relative c'' {
  a1
  a2 a4 a8 a
  a16 a a a a32 a a a a64 a a a a a a a a2
}
![[image of music]](bd/lily-36ec6862.png)
A pontozott hangok után annyi pontot (.) kell írni,
ahányszoros a pontozás. A pontozott hangok ritmusértékét mindig meg kell
adni számmal.
\relative c'' {
  a a a4. a8
  a8. a16 a a8. a8 a4.
}
![[image of music]](a4/lily-8c987c5b.png)
Szünet
Fogalomtár: rest.
A szünetek megadása hasonlóképpen történik, mint a hangoké,
csak a hangmagasság megjelölése helyett r betűt kell írni:
\relative c'' {
  a r r2
  r8 a r4 r4. r8
}
![[image of music]](51/lily-6f530eb9.png)
Ütemmutató
Fogalomtár: time signature.
Az ütemmutató beállítására a \time parancs szolgál:
\relative c'' {
  \time 3/4
  a4 a a
  \time 6/8
  a4. a
  \time 4/4
  a4 a a a
}
![[image of music]](5b/lily-3131da32.png)
Kulcs
Fogalomtár: clef.
A kulcs beállítása a \clef paranccsal lehetséges:
\relative c' {
  \clef treble
  c1
  \clef alto
  c1
  \clef tenor
  c1
  \clef bass
  c1
}
![[image of music]](2b/lily-3ff50130.png)
Mindez együtt
Alább látható egy rövid példa, mely az eddig tanult elemeket mutatja be:
\relative c, {
  \time 3/4
  \clef bass
  c2 e8 c' g'2.
  f4 e d c4 c, r4
}
![[image of music]](7a/lily-2ff2bf7e.png)
Lásd még
Referencia: Writing pitches, Writing rhythms, Writing rests, Time signature, Clef.
| [ << Első lecke ] | [Címoldal][Tartalom][Tárgymutató][ ? ] | [ Elemi kottaírás >> ] | ||
| [ < Egyszerű kottázás ] | [ Fel: Bemeneti fájlok írása ] | [ Hogyan olvassuk a dokumentációt? > ] | ||
1.2.2 A bemeneti fájlok jellemzői
A LilyPond nyelve sok tekintetben hasonlít bizonyos programnyelvekhez.
Érzékeny a kis- és nagybetűk különbségére, az üres helyek (szóközök, újsorok,
tabulátorok stb.) pedig nem számítanak. Ún. kifejezéseket lehet alkotni
kapcsos zárójelek { } segítségével, megjegyzéseket pedig % után
vagy %{ ... %} közé lehet írni.
Ha esetleg nem lennének világosak a fenti mondatok, sebaj! Magyarázatuk részletesen a következő:
-
Érzékeny a kis- és nagybetűk különbségére:
nem mindegy, hogy kisbetűket vagy nagybetűket használunk
(pl.
a, b, s, tnem ugyanaz, mintA, B, S, T). A hangneveket mindig kisbetűvel kell írni:{ c d e }helyes,{ C D E }hibás bemenet. -
Az üres helyek nem számítanak:
mindegy, hogy hova hány szóköz, tabulátor vagy újsor kerül.
{ c d e }ugyanazt jelenti, mint{ cd e } vagy:{ c d e }Természetesen ez így nehezen olvasható. Érdemes a blokkokat beljebb kezdeni egy tabulátorral vagy két szóközzel:
{ c d e } -
Kifejezések:
a LilyPond bemenete { kapcsos zárójelek } között álló zenei
kifejezésekből épül fel (ezekről később lesz szó), akárcsak a zárójelek
()közé zárt matematikai kifejezések. A kapcsos zárójelek köré javasolt szóközt tenni, hacsak nem a sor elején vagy végén szerepelnek.Egy
\karakterrel kezdődő LilyPond parancs az azt követő kapcsos zárójelpár tartalmával együtt ugyancsak egy zenei kifejezésnek számít (mint például a\relative { }). -
Megjegyzések:
a megjegyzések az emberi olvasó számára írt útmutatók; a LilyPond ezeket
figyelmen kívül hagyja, így nem jelennek meg a kimenetben. Kétfajta megjegyzés
van. A százalékjel
%egy olyan megjegyzést kezd, mely a sor végéig tart. Egy egysoros megjegyzés mindig az utána levő sorral kapcsolatos.a4 a a a % most jön a két h hang b2 b
A többsoros megjegyzés (megjegyzésblokk) több sort is közrefoghat. A
%{és%}jelek között minden megjegyzésnek számít. Figyelem, a megjegyzésblokkok nem ágyazhatóak egymásba! Ez azt jelenti, hogy nem lehet egy megjegyzésblokkot egy másikon belülre tenni, mert az első%}jelnél véget ér mindkét megjegyzésblokk. A következő részlet a megjegyzések használatára mutat példát:% Ez itt a "Hull a pelyhes fehér hó" dallama c4 c g' g a a g2 %{ Ez a sor és az alatta levők nem számítanak bele a kimenetbe, mert megjegyzésblokkban szerepelnek. f f e e d d c2 %}
| [ << Első lecke ] | [Címoldal][Tartalom][Tárgymutató][ ? ] | [ Elemi kottaírás >> ] | ||
| [ < A bemeneti fájlok jellemzői ] | [ Fel: Első lecke ] | [ Kapcsos zárójelek elhagyása > ] | ||
1.3 Hogyan olvassuk a dokumentációt?
| 1.3.1 Kapcsos zárójelek elhagyása | ||
| 1.3.2 Kattintható példák | ||
| 1.3.3 A dokumentáció áttekintése |
| [ << Első lecke ] | [Címoldal][Tartalom][Tárgymutató][ ? ] | [ Elemi kottaírás >> ] | ||
| [ < Hogyan olvassuk a dokumentációt? ] | [ Fel: Hogyan olvassuk a dokumentációt? ] | [ Kattintható példák > ] | ||
1.3.1 Kapcsos zárójelek elhagyása
A LilyPond bemenete vagy { } jelek között, vagy pedig egy
\relative c'' { ... } blokkban kell, hogy álljon, ahogy azt a
A bemeneti fájlok jellemzői c. fejezetben láttuk.
A tankönyv további részében a legtöbb példában ezt elhagyjuk. A példák
kipróbálásához a kimenet kimásolható és beilleszthető, de mindig köré
kell rakni a \relative c'' { } blokkot, ha nem szerepel
benne:
\relative c'' {
  ...a példa ide kerül...
}
Miért hagytuk el a kapcsos zárójeleket? A legtöbb példa a kézikönyvben
beszúrható más, hosszabb darabokba. Ezeknél a példáknál nem éri meg
külön megadni a \relative c'' { } blokkot –
esetleg belekerülnének egy nagyobb \relative blokkba, ami nem javasolt!
Ha minden példa körül \relative c'' { } szerepelne,
nem lenne egyszerű az ilyen példákat kimásolni és beilleszteni egy hosszabb
műbe. Mivel a legtöbb felhasználó a neki kellő kódrészleteket egyszerűen
kimásolja a kézikönyvből, úgy döntöttünk, hogy leegyszerűsítjük a példákat.
| [ << Első lecke ] | [Címoldal][Tartalom][Tárgymutató][ ? ] | [ Elemi kottaírás >> ] | ||
| [ < Kapcsos zárójelek elhagyása ] | [ Fel: Hogyan olvassuk a dokumentációt? ] | [ A dokumentáció áttekintése > ] | ||
1.3.2 Kattintható példák
A legtöbb ember úgy tanul bele egy program használatába, hogy a gyakorlatban próbálgatja azt, és játszadozik vele. Ez a LilyPonddal is lehetséges. A kézikönyv HTML változatában bármelyik képre kattintva megtekinthető a pontos bemenet, amelyből a LilyPond a képet generálta. Ez az alábbi példán kipróbálható:
![[image of music]](ba/lily-4654f8fb.png)
A „ly snippet” kezdetű szakasz kimásolásával és beillesztésével már rendelkezésre áll egy kiindulópont a kísérletezéshez. A kép egy az egyben előáll (ugyanakkora méretben), ha a „Start cut-&-pastable section” résztől kezdve a fájl végéig kimásoljuk a szöveget.
| [ << Első lecke ] | [Címoldal][Tartalom][Tárgymutató][ ? ] | [ Elemi kottaírás >> ] | ||
| [ < Kattintható példák ] | [ Fel: Hogyan olvassuk a dokumentációt? ] | [ Elemi kottaírás > ] | ||
1.3.3 A dokumentáció áttekintése
A LilyPondhoz nagyon sok dokumentáció áll rendelkezésre. Az új felhasználóknak emiatt gyakran nem világos, hogy mely részeket kell elolvasniuk, és olykor alapvető fontosságú részeket hagynak ki.
Figyelem: A dokumentáció fontos részeit erősen ajánlott elolvasni, különben a későbbi részek megértése jóval nehezebb lesz.
- Legelőször is: a tankönyvből az Első lecke, majd az Elemi kottaírás fejezeteket kell elolvasni. Amennyiben egy zenei fogalom jelentése nem világos, a Zenei fogalomtárban lehet megkeresni.
- Egy teljes darab írása előtt: a tankönyv Alapfogalmak c. fejezetét javasolt elolvasni. Ezután a Kottaírás kézikönyvében lehet az előforduló kottaelemek beviteli módját megnézni.
- Az alapértelmezett kimenet megváltoztatása előtt: A kimenet finomhangolása olvasandó el.
- Egy nagy mű bevitele előtt: a program használatának kézikönyvéből a Tanácsok LilyPond bemeneti fájlok írásához c. fejezetet érdemes elolvasni.
| [ << Első lecke ] | [Címoldal][Tartalom][Tárgymutató][ ? ] | [ Alapfogalmak >> ] | ||
| [ < A dokumentáció áttekintése ] | [ Fel: Top ] | [ Egyszólamú lejegyzés > ] | ||
2. Elemi kottaírás
Az Első lecke után ez a fejezet ismerteti, hogyan lehet a gyakori kottaelemek felhasználásával gyönyörű kottákat készíteni.
| 2.1 Egyszólamú lejegyzés | ||
| 2.2 Több hang egyszerre | ||
| 2.3 Dalok | ||
| 2.4 Utolsó simítások |
| [ << Elemi kottaírás ] | [Címoldal][Tartalom][Tárgymutató][ ? ] | [ Alapfogalmak >> ] | ||
| [ < Elemi kottaírás ] | [ Fel: Elemi kottaírás ] | [ Módosítás és előjegyzés > ] | ||
2.1 Egyszólamú lejegyzés
Ebben a szakaszban bemutatjuk a kotta gyakori elemeit, egyelőre egy szólamnál maradva.
| 2.1.1 Módosítás és előjegyzés | ||
| 2.1.2 Ívek | ||
| 2.1.3 Artikuláció és dinamika | ||
| 2.1.4 Szöveges utasítások | ||
| 2.1.5 Automatikus és kézi gerendázás | ||
| 2.1.6 Haladó ritmikai parancsok |
| [ << Elemi kottaírás ] | [Címoldal][Tartalom][Tárgymutató][ ? ] | [ Alapfogalmak >> ] | ||
| [ < Egyszólamú lejegyzés ] | [ Fel: Egyszólamú lejegyzés ] | [ Ívek > ] | ||
2.1.1 Módosítás és előjegyzés
Módosítójelek
Fogalomtár: sharp, flat, double sharp, double flat, accidental.
Keresztes hangot a hang neve után közvetlenül is utótagot
írva kapunk, bés hangot pedig es-t írva. Értelemszerűen
kettős kereszt és kettős bé rendre isis és
eses hozzáadásával írható le. Ez a szabály az északi és a germán
nyelvek elnevezési hagyományaiból ered. Más megnevezésű
módosítójelek használata a
Note names in other languages
c. fejezetben van leírva.
cis1 ees fisis, aeses
![[image of music]](ab/lily-b2866140.png)
Előjegyzés
Fogalomtár: key signature, major, minor.
Az előjegyzés a \key parancs segítségével állítható be,
melyet a hangnem alaphangja és színezete (dúr: \major vagy
moll: \minor) követ.
\key d \major
a1
\key c \minor
a
![[image of music]](9e/lily-77824e9b.png)
Figyelmeztetés az előjegyzés és a módosítójelek viszonyával kapcsolatban
Fogalomtár: accidental, key signature, pitch, flat, natural, sharp, transposition.
A módosítások, az előjegyzés és az ütemvonalak együttesen határozzák meg, hogy milyen módosítójelek jelennek meg a kottában. A LilyPond forrásfájlban az előjegyzés után is ki kell tenni a megfelelő módosításokat! Ez a viselkedés elsőre zavart okozhat, úgyhogy bővebb magyarázatra szorul.
A LilyPond különbséget tesz a zenei tartalom és megjelenés, azaz a hangzó és a lejegyzett zene között. A módosítás (hogy egy hang fel van-e emelve vagy le van-e süllyesztve) a hangmagassághoz tartozik, így a zenei tartalom része. Az, hogy a kottában a hang előtt szerepel-e egy kereszt, feloldójel vagy bé, a lejegyzéshez tartozik. A kotta lejegyzésének szigorú szabályai vannak, és a módosítójelek előállításánál a LilyPond intelligens módon ezeket a szabályokat követi. A hangmagasságokat a felhasználó határozza meg: mindig azt kell pontosan leírni, amit az ember hall.
Ebben a példában:
\key d \major
d cis fis
![[image of music]](d5/lily-16bb020d.png)
egyik hang előtt sincs a kottában módosítójel, de ettől a LilyPond
forrásfájlban még ki kell rakni az is
utótagokat, hiszen cisz és fisz hang szól.
Ha leírunk egy b-t, azaz egy h hangot, az nem azt jelenti, hogy
„a megfelelő vonalra egy kottafejet kell írni”, hanem azt, hogy
„itt egy h hang szól”. Pl. Asz-dúrban a h hang elé kerül módosítójel:
\key aes \major
b
![[image of music]](71/lily-bfcb2074.png)
Az, hogy minden módosítást külön meg kell adni, csak kevés többletmunkát igényel a begépelésnél, de több előnye van: könnyebb a transzponálás, valamint a konkrét kiírt módosítójelek többfajta rendszer szerint határozhatóak meg. Ezekre a rendszerekre látható néhány példa az Automatic accidentals c. fejezetben.
Lásd még
Referencia: Note names in other languages, Accidentals, Automatic accidentals, Key signature.
Fogalomtár: Pitch names.
| [ << Elemi kottaírás ] | [Címoldal][Tartalom][Tárgymutató][ ? ] | [ Alapfogalmak >> ] | ||
| [ < Módosítás és előjegyzés ] | [ Fel: Egyszólamú lejegyzés ] | [ Artikuláció és dinamika > ] | ||
2.1.2 Ívek
Átkötés
Fogalomtár: tie.
Átkötött hangot úgy kaphatunk, hogy a hang után egy ~
karaktert írunk.
g4~ g c2~
c4 ~ c8 a8 ~ a2
![[image of music]](8e/lily-aba47c30.png)
Kötőív
Fogalomtár: slur.
A kötőív egy dallamot összefogó ív. Kezdőhangja után
(, záróhangja után ) írandó.
d4( c16) cis( d e c cis d) e( d4)
![[image of music]](89/lily-eba340a3.png)
Frazeálóív
A frázisokat jelölő ívek elejét és végét a \( és
\) jelek határozzák meg. Szerepelhet egyszerre kötőív és frazeálóív,
de egyszerre két kötőív vagy két frazeálóív nem.
a8(\( ais b c) cis2 b'2 a4 cis,\)
![[image of music]](94/lily-c549b833.png)
Figyelmeztetés az átkötés és kötőív viszonyával kapcsolatban
Fogalomtár: articulation, slur, tie.
A kötőív kinézetre hasonlít az átkötéshez, de más a jelentése. Az átkötés egy hang hosszát toldja meg a következő, ugyanolyan magasságú hangéval. A kötőív egy dallam artikulációját határozza meg, és több hangot átívelhet. Természetesen egy kötőíven belül lehetnek átkötött hangok.
c2~( c8 fis fis4 ~ fis2 g2)
![[image of music]](3f/lily-bc94686e.png)
Lásd még
Referencia: Ties, Slurs, Phrasing slurs.
| [ << Elemi kottaírás ] | [Címoldal][Tartalom][Tárgymutató][ ? ] | [ Alapfogalmak >> ] | ||
| [ < Ívek ] | [ Fel: Egyszólamú lejegyzés ] | [ Szöveges utasítások > ] | ||
2.1.3 Artikuláció és dinamika
Artikuláció
Fogalomtár: articulation.
Egy hang artikulációját egy gondolatjel (-) után írt megfelelő
karakterrel lehet jelezni, pl. a staccatóhoz -. írandó a hang után:
c-. c-- c-> c-^ c-+ c-_
![[image of music]](8c/lily-d6acf1b5.png)
Ujjrend
Fogalomtár: fingering.
Hasonlóan az artikulációhoz, az ujjrend a hang után írt
gondolatjellel (-) és számmal jelezhető:
c-3 e-5 b-2 a-1
![[image of music]](fe/lily-2c2b9617.png)
Az artikulációs jelzések és ujjrendek automatikusan a hang helyes oldalára
kerülnek, de ez felülírható, ha a gondolatjelet (-) kicseréljük
^ vagy _ karakterre, ami azt jelenti, hogy a jelzés az előbbi
esetben mindig a hang felett, ill. az utóbbi esetben mindig a hang alatt fog
elhelyezkedni. Egy hangon több artikulációs jel is lehet. Mindazonáltal a
legtöbb esetben legjobb, ha a LilyPond határozza meg, melyik oldalra
kerüljenek a jelzések.
c_-^1 d^. f^4_2-> e^-_+
![[image of music]](a4/lily-30140f0f.png)
Dinamika
Fogalomtár: dynamics, crescendo, decrescendo.
Dinamikai jelzések kottába írásához a megfelelő rövidítést kell
\ karakterrel együtt azon hang után írni, amelytől kezdve érvényes:
c\ff c\mf c\p c\pp
![[image of music]](a4/lily-20187552.png)
A crescendo és decrescendo a \<, ill. \>
paranccsal kezdődik, és a következő dinamikai jelzésnél vagy a \!
parancsnál fejeződik be:
c2\< c2\ff\> c2 c2\!
![[image of music]](73/lily-aa0214d1.png)
Lásd még
Referencia: Articulations and ornamentations, Fingering instructions, Dynamics.
| [ << Elemi kottaírás ] | [Címoldal][Tartalom][Tárgymutató][ ? ] | [ Alapfogalmak >> ] | ||
| [ < Artikuláció és dinamika ] | [ Fel: Egyszólamú lejegyzés ] | [ Automatikus és kézi gerendázás > ] | ||
2.1.4 Szöveges utasítások
A hangokhoz a következő módon lehet szöveges jelzéseket rendelni:
c1^"espr" a_"legato"
![[image of music]](87/lily-f964b769.png)
Ez nem dalszöveg, hanem szöveges előadási utasítások bevitelére szolgál!
Formázott szöveget a \markup blokkon belülre kell elhelyezni:
c1^\markup{ \bold espr}
a1_\markup{
  \dynamic f \italic \small { 2nd } \hspace #0.1 \dynamic p
}
![[image of music]](2c/lily-adbc0d06.png)
Lásd még
Referencia: Writing text.
| [ << Elemi kottaírás ] | [Címoldal][Tartalom][Tárgymutató][ ? ] | [ Alapfogalmak >> ] | ||
| [ < Szöveges utasítások ] | [ Fel: Egyszólamú lejegyzés ] | [ Haladó ritmikai parancsok > ] | ||
2.1.5 Automatikus és kézi gerendázás
Fogalomtár: beam.
A gerendák automatikus elhelyezéséről a LilyPond gondoskodik:
a8 ais d ees r d c16 b a8
![[image of music]](20/lily-141fc400.png)
Amennyiben az automatikus gerendázás nem megfelelő, kézzel felüldefiniálható.
Ha egyszeri alkalommal kell a gerendázást megváltoztatni, a gerenda első
hangja után [, az utolsó hangja után ] írandó.
a8[ ais] d[ ees r d] a b
![[image of music]](e0/lily-b5a4a9cb.png)
Az automatikus gerendázás kikapcsolására az \autoBeamOff parancs
szolgál. Egészen addig tart a hatása, amíg vissza nem kapcsoljuk az
automatikus gerendázást az \autoBeamOn segítségével.
\autoBeamOff
a8 c b4 d8. c16 b4
\autoBeamOn
a8 c b4 d8. c16 b4
![[image of music]](10/lily-0d6c86ed.png)
Lásd még
Referencia: Automatic beams, Manual beams.
| [ << Elemi kottaírás ] | [Címoldal][Tartalom][Tárgymutató][ ? ] | [ Alapfogalmak >> ] | ||
| [ < Automatikus és kézi gerendázás ] | [ Fel: Egyszólamú lejegyzés ] | [ Több hang egyszerre > ] | ||
2.1.6 Haladó ritmikai parancsok
Felütés
Fogalomtár: anacrusis.
Felütés a \partial kulcsszó segítségével kapható.
A parancs után egy ritmusértéket kell írni: \partial 4 egy
negyed értékű felütést, \partial 8 egy nyolcad értékű felütést
eredményez.
\partial 8
f8 c2 d
![[image of music]](c8/lily-17e83cec.png)
n-olák
Fogalomtár: note value, triplet.
Triolák, kvintolák stb. (általánosan n-olák) a \times
kulcsszóval írhatóak le. A parancs után egy törtszámot és egy dallamot kell
írni: a dallamban a hangok hosszúságai a törtszámmal szorzódnak meg. Például
a triolák lejegyzett hosszúságuk 2/3 részéig szólnak, így triolánál
2/3 kell, hogy legyen a tört értéke.
\times 2/3 { f8 g a }
\times 2/3 { c r c }
\times 2/3 { f,8 g16[ a g a] }
\times 2/3 { d4 a8 }
![[image of music]](98/lily-027f4dbb.png)
Előkék
Fogalomtár: grace notes, acciaccatura, appoggiatura.
Az előkéket a \grace parancs jelöli. Súlyos előkék előtt
az \appoggiatura, súlytalanok előtt az \acciaccatura parancs
áll:
c2 \grace { a32[ b] } c2
c2 \appoggiatura b16 c2
c2 \acciaccatura b16 c2
![[image of music]](8a/lily-1fa43fa5.png)
Lásd még
Referencia: Grace notes, Tuplets, Upbeats.
| [ << Elemi kottaírás ] | [Címoldal][Tartalom][Tárgymutató][ ? ] | [ Alapfogalmak >> ] | ||
| [ < Haladó ritmikai parancsok ] | [ Fel: Elemi kottaírás ] | [ A zenei kifejezés fogalma > ] | ||
2.2 Több hang egyszerre
Ebben a szakaszban annak a lehetőségeit vizsgáljuk meg, hogyan lehet többszólamú zenét írni a LilyPondban. Ebbe beletartozik a több hangszerre, több kottasort elfoglaló hangszerre (pl. zongorára) írt művek, valamint akkordok lejegyzése.
A polifónia szót ezentúl annak a speciális esetnek a megnevezésére használjuk, amikor egy vonalrendszeren belül több szólam szerepel.
| 2.2.1 A zenei kifejezés fogalma | ||
| 2.2.2 Több kottasor | ||
| 2.2.3 Kottasor-csoport | ||
| 2.2.4 Hangok akkordba foglalása | ||
| 2.2.5 Több szólam egy kottasoron belül |
| [ << Elemi kottaírás ] | [Címoldal][Tartalom][Tárgymutató][ ? ] | [ Alapfogalmak >> ] | ||
| [ < Több hang egyszerre ] | [ Fel: Több hang egyszerre ] | [ Több kottasor > ] | ||
2.2.1 A zenei kifejezés fogalma
A LilyPond bemeneti fájljaiban a zene zenei kifejezésekből épül fel. Egy hang már egy kifejezés:
a4
![[image of music]](7b/lily-33cd1520.png)
Ha több hangot kapcsos zárójelbe teszünk, egy összetett zenei kifejezés jön létre. Az alábbi példában az összetett zenei kifejezés két hangból áll:
{ a4 g4 }
![[image of music]](e5/lily-3304e44b.png)
A kapcsos zárójel azt jelenti, hogy a benne szereplő zenei kifejezések egymás után következnek: mindegyik akkor kezdődik, amikor az előtte álló befejeződik. A zenei kifejezések egymásba ágyazhatóak:
{ { a4 g } f g }
![[image of music]](93/lily-b73f28d2.png)
Analógia: matematikai kifejezések
Ez a mechanizmus a matematikai képletekhez hasonló: egy nagy képlet sok kicsi képletből, vagyis kifejezésből épül fel, melyek további kifejezéseket tartalmazhatnak, és így tetszőleges bonyolultságú kifejezések létrehozhatóak. Például:
1

1 + 2

(1 + 2) * 3

((1 + 2) * 3) / (4 * 5)
Ebben a sorozatban minden kifejezés a következő kifejezésben egy nagyobb
kifejezés részeként szerepel. A legegyszerűbb kifejezések a számok, összetett
kifejezéseket pedig úgy hozhatunk létre, hogy meglevő kifejezéseket
műveletekkel (mint pl. +, * vagy /) és zárójelekkel
kombinálunk össze. Akárcsak a matematikai kifejezések, a zenei kifejezések is
tetszőleges mélységig egymásba ágyazhatóak, és éppen erre van szükség
többszólamú zene esetén.
Egyidejű zenei kifejezések: több kottasor
Fogalomtár: polyphony.
A fent leírt technikát alkalmazzuk polifónia lejegyzésénél.
Több kottasort vagy több kottasoron belüli szólamot tartalmazó zenénél
párhuzamosan (egyidejűen) kell összekombinálni a kifejezéseket.
Annak a jelzésére, hogy több szólam egyszerre kezd játszani,
<< és >> közé kell foglalni őket; ez jelenti azt, hogy
nem egymás után, hanem egy időben kezdődnek. A következő példában
három dallamot (ezek mindegyike két hangból áll) kombinálunk össze
három szólammá:
\relative c'' {
  <<
    { a4 g }
    { f e }
    { d b }
  >>
}
![[image of music]](4c/lily-f7440380.png)
Amikor egy kifejezés egy másik kifejezésen belül szerepel, érdemes eggyel nagyobb behúzással kezdeni. A LilyPondnak ez nem számít, de a LilyPond forrásfájlt olvasó emberek számára áttekinthetőbb lesz a bemenet.
Figyelem: Relatív módban minden hang magasságát a forrásfájlban őt megelőző
hanghoz képest számítja ki a LilyPond, nem pedig az első relative
parancs viszonyítási hangjához képest.
Egyidejű zenei kifejezések: egy kottasor
A LilyPond onnan állapítja meg, hogy egy vagy több kottasor szerepel-e a darabban, hogy az első kifejezés többszólamú-e. Ha nem, egy kottasort hoz létre, ha igen, többet.
\relative c'' {
  c2 <<c e>>
  << { e f } { c <<b d>> } >>
}
![[image of music]](49/lily-8566277c.png)
| [ << Elemi kottaírás ] | [Címoldal][Tartalom][Tárgymutató][ ? ] | [ Alapfogalmak >> ] | ||
| [ < A zenei kifejezés fogalma ] | [ Fel: Több hang egyszerre ] | [ Kottasor-csoport > ] | ||
2.2.2 Több kottasor
Ahogy azt az előző, A zenei kifejezés fogalma c. szakaszban láttuk, a LilyPond bemeneti fájljai zenei kifejezésekből épülnek fel, és ha egy párhuzamos kifejezés az első, akkor több kottasorból áll a mű. Jobban látható, hogy mi történik, ha világosan megmondjuk, mi szerepeljen külön kottasorban, és mi nem.
Egy kottasor kézzel történő létrehozásához a zenei kifejezés elé
\new Staff parancsot kell írni.
Az így kapott kottasorokat, ahogy már megszoktuk, a << és
>> jelekkel kell összekombinálni:
\relative c'' {
  <<
    \new Staff { \clef treble c }
    \new Staff { \clef bass c,, }
  >>
}
![[image of music]](6b/lily-4ebe939d.png)
A \new parancs egy új kontextus létrehozására szolgál.
Egy kontextus egy zárt környezet, amely zenei eseményeket
(pl. hangokat vagy a \clef paranccsal jelölt kulcsokat) tartalmaz.
Egyszerűbb esetekben sok környezet automatikusan létrejön. Bonyolultabb
műveknél érdemes ezeket a környezeteket kézzel létrehozni.
Sokfajta környezet létezik. Többek között a Score (kotta),
Staff (kottasor) és Voice (szólam) környezetek tartalmazhatnak
dallamokat, míg a Lyrics (dalszöveg) környezet dalszöveget
tartalmazhat, a ChordNames (akkordnevek) környezet pedig akkordok
neveit tartalmazhatja.
A nyelvtanban a \new parancs egy zenei kifejezés elé fűzve
egy nagyobb zenei kifejezésnek számít. Bizonyos szempontból a negatív
előjelre hasonlít a matematikában. A (4+5) képlet egy kifejezés,
így a -(4+5) képlet egy nagyobb kifejezés.
Egy kottasorban elhelyezett ütemmutató minden más kottasorra is hat alapesetben. Ugyanakkor az egy kottasorban szereplő előjegyzés nem hat a többi kottasorra. Ez azért az alapértelmezett viselkedés, mert a transzponáló hangszereket tartalmozó és a politonális zene gyakoribb, mint a poliritmikus.
\relative c'' {
  <<
    \new Staff { \clef treble \key d \major \time 3/4 c }
    \new Staff { \clef bass c,, }
  >>
}
![[image of music]](af/lily-e67245cb.png)
| [ << Elemi kottaírás ] | [Címoldal][Tartalom][Tárgymutató][ ? ] | [ Alapfogalmak >> ] | ||
| [ < Több kottasor ] | [ Fel: Több hang egyszerre ] | [ Hangok akkordba foglalása > ] | ||
2.2.3 Kottasor-csoport
Fogalomtár: brace.
A zongoramuzsikát két összekapcsolt kottasorban szokás lejegyezni.
Egy zongoraszólam így hasonló a Több kottasor c. szakaszban
szereplő több kottasort tartalmazó példához, csak most az egész párhuzamos
kifejezés egy PianoStaff kontextuson belül szerepel:
\new PianoStaff <<
  \new Staff …
  \new Staff …
>>
Egy rövid zongoradarab-részlet:
\relative c'' {
  \new PianoStaff <<
    \new Staff { \time 2/4 c4 e g g, }
    \new Staff { \clef bass c,, c' e c }
  >>
}
![[image of music]](cd/lily-ac9d24ab.png)
Másfajta kottasor-csoportok is léteznek: a zenekari szólamok összekapcsolására
használatos \new GrandStaff vagy a kórusszólamok csoportosítására
szolgáló \new ChoirStaff. Ezek hasonló kontextusok, mint a
\new PianoStaff, csak másfajta kapcsot használnak, és máshogy kötik
össze az ütemvonalakat.
Lásd még
Referencia: Keyboard and other multi-staff instruments, Displaying staves.
| [ << Elemi kottaírás ] | [Címoldal][Tartalom][Tárgymutató][ ? ] | [ Alapfogalmak >> ] | ||
| [ < Kottasor-csoport ] | [ Fel: Több hang egyszerre ] | [ Több szólam egy kottasoron belül > ] | ||
2.2.4 Hangok akkordba foglalása
Fogalomtár: chord.
Korábban láttuk, hogyan lehet több szólamot elérni dupla kacsacsőrök használatával. Ehhez hasonló az akkordok leírása: az akkord hangjait egyszeres kacsacsőrök közé kell zárni. Mivel egy akkord minden hangja ugyanannyi ideig tart, az akkord ritmusértékét nem az egyes akkordhangok, hanem a záró kacsacsőr után kell megadni.
r4 <c e g>4 <c f a>2
![[image of music]](d1/lily-6006083e.png)
Az akkordokra érdemes úgy gondolni, mint az egyes hangokra: szinte minden, amit egy hanghoz lehet rendelni, az egy egész akkordhoz is rendelhető, ha a kacsacsőrökön kívül helyezzük el. Például így lehet átkötött vagy másképpen gerendázott akkordokat elérni: a megfelelő jelzések a kacsacsőrök után szerepelnek.
r4 <c e g>8[ <c f a>]~ <c f a>2
r4 <c e g>8( <c e g>\> <c e g>4 <c f a>\!)
![[image of music]](c0/lily-55d8ef6c.png)
| [ << Elemi kottaírás ] | [Címoldal][Tartalom][Tárgymutató][ ? ] | [ Alapfogalmak >> ] | ||
| [ < Hangok akkordba foglalása ] | [ Fel: Több hang egyszerre ] | [ Dalok > ] | ||
2.2.5 Több szólam egy kottasoron belül
A polifónia, azaz egy kottasoron belüli szólamok lejegyzése, bár nem bonyolult jelenség, olyan fogalmak megértését feltételezi, amelyeket még nem tárgyaltunk. Ezt most sem fogjuk megtenni. Ehelyett a tankönyv megfelelő részére hivatkozunk, amely részletesen elmagyarázza a témakört.
Lásd még
Tankönyv: A szólamok zenét tartalmaznak.
Referencia: Simultaneous notes.
| [ << Elemi kottaírás ] | [Címoldal][Tartalom][Tárgymutató][ ? ] | [ Alapfogalmak >> ] | ||
| [ < Több szólam egy kottasoron belül ] | [ Fel: Elemi kottaírás ] | [ Egyszerű dalok kottázása > ] | ||
2.3 Dalok
Ez a szakasz a vokális zene és egyszerű dalok, valamint könnyűzenei számok lejegyzésébe nyújt betekintést.
| 2.3.1 Egyszerű dalok kottázása | ||
| 2.3.2 Dalszöveg igazítása a dallamhoz | ||
| 2.3.3 Azonos dalszöveg több kottasorhoz |
| [ << Elemi kottaírás ] | [Címoldal][Tartalom][Tárgymutató][ ? ] | [ Alapfogalmak >> ] | ||
| [ < Dalok ] | [ Fel: Dalok ] | [ Dalszöveg igazítása a dallamhoz > ] | ||
2.3.1 Egyszerű dalok kottázása
Fogalomtár: lyrics.
Egy angol gyermekdal, a Girls and boys come out to play így kezdődik:
\relative c'' {
  \key g \major
  \time 6/8
  d4 b8 c4 a8 d4 b8 g4
}
![[image of music]](4b/lily-4071e345.png)
Dalszöveget legegyszerűbben úgy lehet hozzáadni a dallamhoz,
hogy a dallam után írjuk az \addlyrics parancsot, majd a dalszöveget.
Minden szótagot szóközzel kell elválasztani.
<<
  \relative c'' {
    \key g \major
    \time 6/8
    d4 b8 c4 a8 d4 b8 g4
  }
  \addlyrics {
    Girls and boys come out to play,
  }
>>
![[image of music]](65/lily-4a68158e.png)
Mind a dallamot, mind a dalszöveget kapcsos zárójelbe kell tenni, az egész
dalt pedig << ... >> közé, mivel a zene és a szöveg egyszerre
kezdődik.
| [ << Elemi kottaírás ] | [Címoldal][Tartalom][Tárgymutató][ ? ] | [ Alapfogalmak >> ] | ||
| [ < Egyszerű dalok kottázása ] | [ Fel: Dalok ] | [ Azonos dalszöveg több kottasorhoz > ] | ||
2.3.2 Dalszöveg igazítása a dallamhoz
Fogalomtár: melisma, extender line.
A gyerekdal következő sora: The moon doth shine as bright as day. Írjuk be ezt is:
<<
  \relative c'' {
    \key g \major
    \time 6/8
    d4 b8 c4 a8 d4 b8 g4
    g8 a4 b8 c b a d4 b8 g4.
  }
  \addlyrics {
    Girls and boys come out to play,
    The moon doth shine as bright as day;
  }
>>
![[image of music]](ca/lily-f9e856f6.png)
A shine szót két hangra kellene énekelni, így a dalszöveg nem illeszkedik helyesen a hangokra. Egy melizmát kell létrehozni. Több lehetőség van arra, hogy egy szótagot több hangra elnyújtsunk; a legegyszerűbb, ha a melizma hangjait kötőívvel összekötjük (ld. az Ívek szakaszt):
<<
  \relative c'' {
    \key g \major
    \time 6/8
    d4 b8 c4 a8 d4 b8 g4
    g8 a4 b8 c( b) a d4 b8 g4.
  }
  \addlyrics {
    Girls and boys come out to play,
    The moon doth shine as bright as day;
  }
>>
![[image of music]](a9/lily-32aa3e56.png)
Most már a dalszöveg jól illeszkedik a dallamra, de az automatikus gerendázás az angolszász konvenció értelmében nem megfelelő a shine as szavakon. Írjuk felül ezt kézzel (ld. az Automatikus és kézi gerendázás szakaszt):
<<
  \relative c'' {
    \key g \major
    \time 6/8
    d4 b8 c4 a8 d4 b8 g4
    g8 a4 b8 c([ b]) a d4 b8 g4.
  }
  \addlyrics {
    Girls and boys come out to play,
    The moon doth shine as bright as day;
  }
>>
![[image of music]](0a/lily-a30c067a.png)
A melizmát úgy adhatjuk meg másképp a kötőív helyett, hogy a dalszövegben
annyi alulvonás karakterrel (_) látjuk el a szótagot, ahány hangra (az elsőt
leszámítva) kiterjed:
<<
  \relative c'' {
    \key g \major
    \time 6/8
    d4 b8 c4 a8 d4 b8 g4
    g8 a4 b8 c[ b] a d4 b8 g4.
  }
  \addlyrics {
    Girls and boys come out to play,
    The moon doth shine _ as bright as day;
  }
>>
![[image of music]](f4/lily-1311ecab.png)
Ha egy melizma nagyon hosszú, szótagjelző vonalat szokás húzni,
amíg a melizma tart. Ezt két alulvonással (__) jelezzük. Íme Purcell
Dido és Aeneas c. operájából Dido búcsúáriájának első
három üteme:
<<
  \relative c'' {
    \key g \minor
    \time 3/2
    g2 a bes bes( a)
    b c4.( bes8 a4. g8 fis4.) g8 fis1
  }
  \addlyrics {
    When I am laid,
    am laid __ in earth,
  }
>>
![[image of music]](8e/lily-c9b787ff.png)
Eddig még egy példában sem szerepelt több szótagból álló szó.
Általában minden szótagot külön hangra kell énekelni, a szótagok
közé kötőjel kerül a kottában. Ezt a forrásfájlban két gondolatjel
-- jelzi. Következő példánkban mindaz szerepel, amit eddig
megtanultunk a dallam és szöveg összekapcsolásáról:
<<
  \relative c' {
    \key g \major
    \time 3/4
    \partial 4
    d4 g4 g a8( b) g4 g4
    b8( c) d4 d e4 c2
  }
  \addlyrics {
    A -- way in a __ man -- ger,
    no __ crib for a bed, __
  }
>>
![[image of music]](54/lily-a3596be5.png)
Más dalszövegeknél, főleg olasz nyelvűeknél, épp ennek ellenkezőjére van
szükség: több szótagot kell egy hangra énekelni. Ezt úgy érhetjük el,
hogy összekötjük a két szótagot egy alulvonás karakterrel (_),
szóközök nélkül, vagy idézőjelbe rakjuk őket.
Rossini operájának alábbi részletében, Figaro Largo al factotum
kezdetű áriájában a Largo szó go szótagját és az
al szót ugyanarra a hangra kell énekelni:
<<
  \relative c' {
    \clef bass
    \key c \major
    \time 6/8
    c4.~ c8 d b c([ d]) b c d b c
  }
  \addlyrics {
    Lar -- go_al fac -- to -- tum del -- la cit -- tà
  }
>>
![[image of music]](e1/lily-20cab287.png)
Lásd még
Referencia: Vocal music.
| [ << Elemi kottaírás ] | [Címoldal][Tartalom][Tárgymutató][ ? ] | [ Alapfogalmak >> ] | ||
| [ < Dalszöveg igazítása a dallamhoz ] | [ Fel: Dalok ] | [ Utolsó simítások > ] | ||
2.3.3 Azonos dalszöveg több kottasorhoz
Ha ugyanazt a dalszöveget akarjuk több szólamhoz rendelni, választhatjuk az egyszerű megközelítést, mint ebben a példában, mely Händel Júdás Makkabeus c. oratóriumából való:
<<
  \relative c'' {
    \key f \major
    \time 6/8
    \partial 8
    c8 c([ bes]) a a([ g]) f f'4. b, c4.~ c4
  }
  \addlyrics {
    Let flee -- cy flocks the hills a -- dorn, __
  }
  \relative c' {
    \key f \major
    \time 6/8
    \partial 8
    r8 r4. r4 c8 a'([ g]) f f([ e]) d e([ d]) c bes'4
  }
  \addlyrics {
    Let flee -- cy flocks the hills a -- dorn,
  }
>>
![[image of music]](50/lily-20973288.png)
Érdemes azonban a dalszöveget csak egyszer leírni, és később hivatkozni rá változók segítségével. Ez a módszer a Művek szervezettebbé tétele változók segítségével c. szakaszban olvasható.
Lásd még
Referencia: Vocal music.
| [ << Elemi kottaírás ] | [Címoldal][Tartalom][Tárgymutató][ ? ] | [ Alapfogalmak >> ] | ||
| [ < Azonos dalszöveg több kottasorhoz ] | [ Fel: Elemi kottaírás ] | [ Művek szervezettebbé tétele változók segítségével > ] | ||
2.4 Utolsó simítások
Ez gyakorlatunk befejező szakasza. Bemutatja, hogyan végezzük el az utolsó simításokat egyszerű műveken, valamint bevezetést nyújt a tankönyv további részébe.
| 2.4.1 Művek szervezettebbé tétele változók segítségével | ||
| 2.4.2 Verziószám | ||
| 2.4.3 Cím és más adatok megadása | ||
| 2.4.4 Abszolút hangmagasság-megadás | ||
| 2.4.5 Hogyan tovább? |
| [ << Elemi kottaírás ] | [Címoldal][Tartalom][Tárgymutató][ ? ] | [ Alapfogalmak >> ] | ||
| [ < Utolsó simítások ] | [ Fel: Utolsó simítások ] | [ Verziószám > ] | ||
2.4.1 Művek szervezettebbé tétele változók segítségével
Amikor a fentebb tárgyalt elemeket hosszabb művekké kombináljuk össze, nagyon nagy és összetett zenei kifejezések állhatnak elő. Sok szólam esetén a bemeneti fájlok áttekinthetetlenekké válnak. Átláthatóságukat változók használatával javíthatjuk.
A változók (másnéven azonosítók vagy makrók) segítségével a komplex zenei kifejezéseket kisebb részekre bonthatjuk. Egy változóhoz a következőképpen rendelhetünk értéket:
dallam = { … }
A dallam nevű zenei kifejezés tartalma később bárhová beilleszthető.
Ehhez csak egy \ karaktert kell a neve elé írni (\dallam,
akárcsak egy LilyPond parancs esetén).
hegedu = \new Staff {
  \relative c'' {
    a4 b c b
  }
}
csello = \new Staff {
  \relative c {
    \clef bass
    e2 d
  }
}
{
  <<
    \hegedu
    \csello
  >>
}
![[image of music]](1a/lily-ce61dbf7.png)
A változók nevei csak az angol ábécé betűit tartalmazhatják. Nem tartalmazhatnak ékezetes karaktert, számot, aláhúzást, kötőjelet stb.
A változókat azelőtt kell definiálni, mielőtt még hivatkoznánk rájuk, de később akármennyiszer felhasználhatjuk őket, így pl. könnyebben vihetünk be sokszor ismétlődő szakaszokat. Akár egy másik változó definíciójában is hivatkozhatunk egy korábbi változóra.
triolaA = \times 2/3 { c,8 e g }
utemA = { \triolaA \triolaA \triolaA \triolaA }

\relative c'' {
 \utemA \utemA
}
![[image of music]](00/lily-763bbf73.png)
Sok más típusú értéket is hozzárendelhetünk egy változóhoz. Például:
szelesseg = 4.5\cm
nev = "Wendy"
AOtosLap = \paper { paperheight = 21.0 \cm }
Tartalmától függően egy változó különböző helyeken használható fel. Az alábbi példa a fenti változókat hasznosítja újra:
\paper {
  \AOtosLap
  line-width = \szelesseg
}
{
  c4^\name
}
| [ << Elemi kottaírás ] | [Címoldal][Tartalom][Tárgymutató][ ? ] | [ Alapfogalmak >> ] | ||
| [ < Művek szervezettebbé tétele változók segítségével ] | [ Fel: Utolsó simítások ] | [ Cím és más adatok megadása > ] | ||
2.4.2 Verziószám
A \version utasítással kell megadni, hogy a LilyPond melyik verziója
számára készült a fájl:
\version "2.13.45"
Ezt megállapodás szerint a LilyPond fájl legelejére helyezzük.
A verziómegjelölés célja, hogy a LilyPond későbbi verziójára való átállás
minél zökkenőmentesebb legyen. A nyelvtanban bekövetkezett változásokat egy
speciális program, a convert-ly képes kezelni, és a \version
utasítás alapján állapítja meg, hogy milyen szabályok szerint frissítse a
fájlt. Erről bővebb információ a
Updating files with convert-ly
szakaszban található.
| [ << Elemi kottaírás ] | [Címoldal][Tartalom][Tárgymutató][ ? ] | [ Alapfogalmak >> ] | ||
| [ < Verziószám ] | [ Fel: Utolsó simítások ] | [ Abszolút hangmagasság-megadás > ] | ||
2.4.3 Cím és más adatok megadása
A címet, szerzőt, opus-számot és hasonló adatokat a \header
blokkban kell megadni. Ez a fő zenei kifejezésen kívül helyezendő el; a
\header blokk általában a verziószám alatt szerepel.
\version "2.13.45"
\header {
  title = "Szimfónia"
  composer = "Én"
  opus = "Op. 9"
}

{
  … zene …
}
Amikor a fájl feldolgozásra kerül, a cím és a szerző neve a kotta tetején jelenik meg nyomtatásban. A mű egyéb adatainak megadási módja és elhelyezése a Creating titles c. fejezetben található.
| [ << Elemi kottaírás ] | [Címoldal][Tartalom][Tárgymutató][ ? ] | [ Alapfogalmak >> ] | ||
| [ < Cím és más adatok megadása ] | [ Fel: Utolsó simítások ] | [ Hogyan tovább? > ] | ||
2.4.4 Abszolút hangmagasság-megadás
Eddig mindig \relative módban adtuk meg a hangmagasságot.
Ez a legkönnyebb módja a legtöbb zenemű bevitelének, de létezik a
hangmagasság megadásának egy másik módja is: az abszolút mód.
A LilyPond a \relative blokk elhagyása esetén minden hangmagasságot
abszolútként értelmez. A c' mindig az egyvonalas c hangot jelöli, a
b az alatta levő hangot, a kis h-t, a g, pedig a nagy g-t.
{
  \clef bass
  c' b g, g,
  g, f, f c'
}
![[image of music]](ec/lily-ad85b349.png)
Íme egy négy oktávos skála:
{
  \clef bass
  c, d, e, f,
  g, a, b, c
  d e f g
  a b c' d'
  \clef treble
  e' f' g' a'
  b' c'' d'' e''
  f'' g'' a'' b''
  c'''1
}
![[image of music]](7f/lily-4123edf6.png)
Amint az látható, a magas hangok beviteléhez sok ' jel szükséges.
Itt van például egy Mozart-idézet:
{
  \key a \major
  \time 6/8
  cis''8. d''16 cis''8 e''4 e''8
  b'8. cis''16 b'8 d''4 d''8
}
![[image of music]](6e/lily-eaf66b71.png)
A sok aposztróftól kevésbé lesz olvasható a bemenet, és így könnyebb hibázni.
A \relative módban az előző példát sokkal könnyebb elolvasni és
begépelni:
\relative c'' {
  \key a \major
  \time 6/8
  cis8. d16 cis8 e4 e8
  b8. cis16 b8 d4 d8
}
![[image of music]](cd/lily-0165492d.png)
Ha relatív módban hibát vét az ember (eggyel több vagy kevesebb ' vagy
, jelet használ), a hiba azonnal szembetűnő – a hibás hangtól kezdve
minden hang elcsúszik egy oktávval. Abszolút módban az egyszeri hiba nem
ilyen könnyen észrevehető, és nehezebb megtalálni.
Az abszolút mód olyan dallamoknál lehet előnyös, amelyekben nagy hangközugrások vannak, de leginkább a LilyPond-fájlok számítógéppel történő generálásánál bizonyul különösen hasznosnak.
| [ << Elemi kottaírás ] | [Címoldal][Tartalom][Tárgymutató][ ? ] | [ Alapfogalmak >> ] | ||
| [ < Abszolút hangmagasság-megadás ] | [ Fel: Utolsó simítások ] | [ Alapfogalmak > ] | ||
2.4.5 Hogyan tovább?
Gratulálunk az alapok elsajátításához! Eme tanulmányok után javasolt egy-két darab begépelésével nagyobb gyakorlatra szert tenni. Egy lehetőség például a Sablonok használata. Ha valamilyen kottaelem ismertetésére még nem került volna sor, a Kottaírás kézikönyvéből kikereshető, a Musical notation fejezettől kezdve. A sablonok között nem szereplő hangszeregyüttes esetén érdemes A sablonok kibővítése c. fejezetet elolvasni.
Pár rövid darab megírása után következhetnek a tankönyv további fejezetei. Természetesen már most is elolvashatóak, de mivel nagyobb jártasságot feltételeznek a LilyPond nyelvében, tanácsos most ezeket átlapozni, és csak azután visszatérni rájuk, amikor már több tapasztalatot szerzett az ember.
A tankönyv minden szakaszának végén található egy Lásd még bekezdés is, mely más szakaszokra mutató kereszthivatkozásokat tartalmaz: ezeket első olvasásra nem praktikus követni, csak az egész tankönyv elolvasása után, az összefüggések meglátása végett.
Minél előbb ajánlott elolvasni a dokumentációról szóló szakaszt. Mivel nagy mennyiségű segédanyag áll rendelkezésre a LilyPondról, az új felhasználók sokszor nem tudják, hova forduljanak segítségért. A dokumentációról szóló rész figyelmes elolvasása csak öt percbe kerül, de megelőzi azt, hogy az olvasó bosszantó órákat töltsön azzal, hogy rossz helyen keresgél.
| [ << Elemi kottaírás ] | [Címoldal][Tartalom][Tárgymutató][ ? ] | [ A kimenet finomhangolása >> ] | ||
| [ < Hogyan tovább? ] | [ Fel: Top ] | [ Hogyan működnek a LilyPond bemeneti fájlok? > ] | ||
3. Alapfogalmak
Miután megtanultuk, hogyan állíthatunk elő gyönyörű kottákat egyszerű szöveges fájlokból, ebben a szakaszban megismerjük azokat a fogalmakat és technikákat, amelyek segítségével hasonlóan gyönyörű, de bonyolultabb kottákat készíthetünk.
| 3.1 Hogyan működnek a LilyPond bemeneti fájlok? | ||
| 3.2 A szólamok zenét tartalmaznak | ||
| 3.3 Kontextusok és ábrázolók | ||
| 3.4 A sablonok kibővítése |
| [ << Alapfogalmak ] | [Címoldal][Tartalom][Tárgymutató][ ? ] | [ A kimenet finomhangolása >> ] | ||
| [ < Alapfogalmak ] | [ Fel: Alapfogalmak ] | [ Bevezetés a LilyPond fájlok szerkezetébe > ] | ||
3.1 Hogyan működnek a LilyPond bemeneti fájlok?
A LilyPond bemeneti formátuma meglehetősen rugalmas, így a tapasztalt felhasználóknak nagy szabadságot ad abban, hogyan strukturálják a forrásfájljaikat. De ez a rugalmasság az újdonsült felhasználók számára bonyolult lehet. Ez a szakasz elmagyarázza a struktúra nagy részét, az egyszerűség kedvéért bizonyos részleteket elnagyolva. A bemeneti formátum felépítésének teljes leírása a File structure c. szakaszban olvasható.
| 3.1.1 Bevezetés a LilyPond fájlok szerkezetébe | ||
| 3.1.2 A kotta egy összetett zenei kifejezés | ||
| 3.1.3 Zenei kifejezések egymásba ágyazása | ||
| 3.1.4 A gerendák és ívek átfedhetik egymást |
3.1.1 Bevezetés a LilyPond fájlok szerkezetébe
A LilyPond bemeneti fájlok szerkezetére egy tipikus példa:
\version "2.13.45"

\header { }

\score {
  ...összetett zenei kifejezés...  % ide jön a zene!
  \layout { }
  \midi { }
}
Ennek az alapvető mintának sok változata lehetséges, de ez a példa jó kiindulási alapot jelent.
Eddig egyik példa sem használta a \score{} parancsot. Ennek oka, hogy
a LilyPond automatikusan hozzáadja az egyszerű bemenethez a szükséges
parancsokat. A következő bemenet például:
\relative c'' {
  c4 a d c
}
a következő rövidítése:
\book {
  \score {
    \new Staff {
      \new Voice {
        \relative c'' {
          c4 a b c
        }
      }
    }
    \layout { }
  }
}
Más szóval, ha a bemenet egyetlen zenei kifejezést tartalmaz, a LilyPond úgy értelmezi a fájlt, mintha a zenei kifejezés körül már szerepelnének a fenti parancsok.
Figyelem! A dokumentációban sok példa nem tartalmazza a
\new Staff és \new Voice parancsokat, így azok implicite kerülnek
létrehozásra. Ez egyszerű példáknál jól működik, de bonyolultabb esetekben,
főleg, ha más parancsokat is használunk, a kontextusok implicit létrehozása
meglepő kimenetet eredményezhet, például nemkívánatos kottasorok jelenlétét.
A kontextusok explicit megadásának módja a Kontextusok és ábrázolók c.
részben olvasható.
Figyelem: Többszólamú zeneművek esetén ajánlott explicit módon létrehozni a kottasorokat és az azon belüli szólamokat.
Egyelőre térjünk vissza az első példánkhoz, és vizsgáljuk meg csak a
\score parancsot.
A \score blokkon belül először pontosan egy zenei kifejezésnek kell
következnie.
Emlékezzünk arra, hogy egy zenei kifejezés lehet egy hang is, de akár
egy olyan nagy összetett kifejezés is, mint:
{
  \new StaffGroup <<
    ...egy teljes Wagner-opera zenei anyaga...
  >>
}
Mivel mindez egy { ... } blokkban szerepel, egy zenei
kifejezésnek számít.
Ahogy korábban láttuk, a \score blokk a zenén kívül más definíciókat is
tartalmazhat, mint például:
\score {
  { c'4 a b c' }
  \header { }
  \layout { }
  \midi { }
}
Ez a három parancs – \header, \layout és \midi –
speciális: az eddigi parancsokkal ellentétben nem zenei kifejezések, és
nem azok részei. A \score blokkon belül vagy kívül is elhelyezkedhetnek
– például a \header (fejléc) blokk, melyben a kotta adatait (pl. cím,
szerző stb.) lehet megadni, legtöbbször a \score parancs előtt szerepel,
ahogy a szakasz elején található példában is látható.
A két további, még ismeretlen parancs: \layout {} és
\midi {}. Ezek ebben a formában rendre azt jelentik, hogy a LilyPond
kottaképet, ill. hangzó anyagot állítson elő. Teljes leírásuk a Kottaírás
Kézikönyvében található, a
Score layout és a
Creating MIDI files szakaszokban.
Egy fájlban több \score blokk lehet. Mindegyik egy-egy zeneművet
vagy tételt jelöl, de ezek egy kimeneti fájlban fognak megjelenni. Nem
szükséges \book blokkba foglalni őket – ez implicite megtörténik.
Ha azonban több kimeneti fájlt szeretnénk kapni egy forrásfájlból, akkor több
\book blokkot kell megadnunk – kimeneti fájlonként egyet-egyet.
Összegezve:
Minden \book blokk külön kimeneti fájlt eredményez (pl. egy-egy PDF
állományt). Ha nem szerepel explicit módon a forráskódban, akkor a LilyPond
körülveszi az egész forráskódot egy \book blokkal.
Egy \book blokkon belül minden \score blokk különálló zenei
egységet jelöl.
Minden \layout blokk arra a \score vagy \book blokkra
érvényes, amelyben szerepel – tehát egy \score blokkon belüli
\layout blokk csakis arra az egy \score blokkra vonatkozik,
de egy \score blokkon kívüli \layout blokk a \score
blokkot tartalmazó (akár explicit, akár implicit) \book blokkon belüli
minden \score blokkra érvényes.
A részletek a Multiple scores in a book c. részben olvashatók.
Fájljainkat áttekinthetőbbé tehetjük változók definiálásával (ld. Művek szervezettebbé tétele változók segítségével). Minden sablonban ezt a módszert használjuk:
dallam = \relative c' {
  c4 a b c
}

\score {
  \dallam
}
Amikor a LilyPond feldolgozza ezt a fájlt, a dallam változó értékét
(azaz mindent az egyenlőségjel utáni zenei kifejezésből) beszúrja mindenhova,
ahol \dallam hivatkozást lát. A változók nevére nincs sok megkötés – a
következők mind helyes példák: dallam, jobbKez, fuvola,
BII stb. A Kevesebb gépelés változókkal és függvényekkel c.
szakasz további információkat tartalmaz. Mindössze annyi a korlátozás, hogy a
változónevek csak az angol abc betűit tartalmazhatják, és nem ütközhetnek a
LilyPond parancsok neveivel. A pontos szabályok a
File structure c.
részben vannak leírva.
Lásd még
A bemeneti formátum teljes definíciója a File structure c. szakaszban található.
3.1.2 A kotta egy összetett zenei kifejezés
Az előző szakaszban (Bevezetés a LilyPond fájlok szerkezetébe) már láttuk
a LilyPond fájlok általános felépítését. De a legfontosabb részt mintha
átugrottuk volna: mi kerüljön a \score blokk belsejébe?
Valójában ez sokkal egyszerűbb, mint gondolnánk. Ez a mondat mindent megmagyaráz:
A
\scoreblokknak egy összetett zenei kifejezéssel kell kezdődnie.
Az összetett zenei kifejezés fogalmát már tisztáztuk A zenei kifejezés fogalma c. részben. Láttuk, hogy építhetünk fel nagy zenei kifejezéseket kis részekből – először hangokból, aztán akkordokból stb. Most egy összetett zenei kifejezést vizsgálunk meg felülről lefelé. Az egyszerűség kedvéért egy zongorakíséretes dal lesz a példánk. Először is szükségünk van az énekes és a zongorista szólamára.
\score {
  <<
    \new Staff = "enek" <<
    >>
    \new PianoStaff = "zongora" <<
    >>
  >>
  \layout { }
}
Elneveztük a két szólamot „enek” és „zongora” néven. Ez nem kötelező, de jó szokás, hogy első pillantásra lássuk, melyik szólam mire szolgál.
Emlékezzünk arra, hogy << ... >> szolgál több szólam jelölésére. Ennek
hatására az ének- és a zongoraszólam egymás alatt fog megjelenni a kottában.
A zongoraszólam két kottasort fog tartalmazni, az énekszólam pedig egy
kottasort és egy dalszöveget, így mindkettőhöz << ... >> blokk kell.
A dalszöveghez az \addlyrics parancsot fogjuk használni. Ha szükséges
feleleveníteni, az Egyszerű dalok kottázása c. részben olvashatunk róla.
\score {
  <<
    \new Staff = "enek" <<
      \new Voice = "dallam" { c'1 }
      \addlyrics { Szólt }
    >>
    \new PianoStaff = "zongora" <<
      \new Staff = "jobbkez" { c'1 }
      \new Staff = "bal" { c'1 }
    >>
  >>
  \layout { }
}
![[image of music]](1f/lily-9640142c.png)
Most megvan a teljes struktúra. Az énekszólam egy Voice kontextust
tartalmaz a hangoknak, és egy strófányi dalszöveget. A zongoraszólam pedig
a jobb- és balkéz kottasorait tartalmazza.
Most elkezdhetjük kitölteni a hangokat. Elkezdhetnénk közvetlenül a Voice kontextus belsejébe beleírni, hogy:
\relative c'' {
  r4 d8\noBeam g, c4 r
}
De ha ezt tennénk, a \score blokk nagyon bonyolult lenne, és nem lehetne
átlátni a szólamok szerkezetét. Így érdemes változókat használni. A dalszöveg
változóként való megadására a \lyricmode parancsot kell használni, hogy
a LilyPond dalszövegként és ne hangokként értelmezze a változó tartalmát.
(A dalszöveg egy külön beviteli mód, ezekből még több is van, ld. az
Input modes c. részt.)
Tehát miután definiáltuk a megfelelő változókat, hivatkoztunk rájuk, és basszuskulccsal láttuk el a balkezet, kész egy valódi mű kezdete:
dallam = \relative c'' { r4 d8\noBeam g, c4 r }
dalszoveg = \lyricmode { Szólt az Úr, }
jobbkez = \relative c'' { <g d g,>2~ <g d g,> }
balkez = \relative c { b2 e2 }

\score {
  <<
    \new Staff = "enek" <<
      \new Voice = "dallam" { \dallam }
      \addlyrics { \dalszoveg }
    >>
    \new PianoStaff = "zongora" <<
      \new Staff = "jobbkez" { \jobbkez }
      \new Staff = "balkez" {
        \clef "bass"
        \balkez
      }
    >>
  >>
  \layout { }
}
![[image of music]](f4/lily-0a919983.png)
Amikor a \score blokkot írjuk vagy olvassuk, mindig lassan, gondosan
járjunk el. Haladjunk kívülről befelé, a magas szintű felépítéstől a részletek
felé haladva. Nagyban segít, ha ügyelünk a behúzásokra – minden blokk
kezdődjön egy tabulátorral beljebb, így az egy szinten levő blokkok ugyanolyan
mértékben lesznek behúzva.
Lásd még
Referencia: Structure of a score.
3.1.3 Zenei kifejezések egymásba ágyazása
Ossiák bevitelekor jön jól, hogy kottasorok bármikor, darab közben is kezdődhetnek, és bármikor végződhetnek. Álljon itt erre egy példa:
\new Staff {
  \relative g' {
    r4 g8 g c4 c8 d |
    e4 r8
    <<
      { f c c }
      \new Staff {
        f8 f c
      }
    >>
    r4 |
  }
}
![[image of music]](6c/lily-37dcc907.png)
Figyeljük meg, hogy a kulcs mérete némileg kisebb, mint a sor elején szereplő kulcsé (mint ahogy kulcsváltásnál is).
Az ossia a kottasor fölött is elhelyezkedhet:
\new Staff = "main" {
  \relative g' {
    r4 g8 g c4 c8 d |
    e4 r8
    <<
      { f c c }
      \new Staff \with {
        alignAboveContext = #"main" }
      { f8 f c }
    >>
    r4 |
  }
}
![[image of music]](24/lily-d8a81073.png)
Ebben a példában a még ismeretlen \with parancsot használtuk, amelyet
később ismertetünk. Most elég annyit tudni róla, hogy a kottasor bizonyos
tulajdonságainak módosítására szolgál. Itt egy olyan tulajdonságot adunk meg,
ami azt mondja, hogy az új kottasor a „main” nevű kottasor felett
helyezkedjen el (ahelyett, hogy alatta helyezkedne el, ami az alapértelmezés).
Lásd még
Az ossiákat általában kulcs és ütemmutató nélkül, valamint kisebb méretben szedjük. Ehhez további új parancsok kellenek; ld. az Objektumok mérete és Ossia staves szakaszokat.
3.1.4 A gerendák és ívek átfedhetik egymást
Már sok zárójelfajtával találkoztunk a LilyPond fájlok írása közben. Ezekre különböző szabályok vonatkoznak, amelyeket érdemes tisztázni. Ismételjük át ezeket a típusokat.
Zárójelfajta | Szerep |
|---|---|
| Egymás után megszólaló hangokat tartalmaz |
| Egy akkord hangjait tartalmazza |
| Egyszerre megszólaló zenei kifejezéseket tartalmaz |
| Egy ív kezdetét és végét jelöli |
| Egy frazeálóív kezdetét és végét jelöli |
| Egy kézi gerenda kezdetét és végét jelöli |
A LilyPond világán kívül a különböző fajtájú zárójeleket megfelelően egymásba
kell ágyazni, pl. így: << [ { ( .. ) } ] >>. Tehát a záró
zárójeleknek pontosan fordított sorrendben kell állniuk, mint a nyitó
zárójeleknek. A fenti táblázatban szereplő első három típusnál (a blokkoknál)
ezt a LilyPond is megköveteli. A többi parancsnál ez nem követelmény.
Valójában ezekre nem is úgy érdemes gondolni, mint a zárójelekre, hanem olyan
jelzésekre, amelyek zenei elemek kezdetét és végét jelölik.
Tehát például egy frazeálóív kezdődhet egy kézzel megadott gerenda előtt, és befejeződhet a gerenda vége előtt – lehet, hogy nem a legzeneibb megoldás, de lehetséges:
{ g8\( a b[ c b\) a] }
![[image of music]](f4/lily-ca8d80de.png)
Általánosságban az ívek, frazeálóívek, kötőívek és gerendák átnyúlhatnak a triolák és előkék határain. A következő példában az 1. sorban egy gerenda, a 2. sorban egy kötőív nyúl bele egy triolába, a 3. és 4. sorban pedig mindezek mellett még egy kötőív is található két triola között, valamint egy frazeálóív, amely túlnyúlik a triolán.
{
  r16[ g16 \times 2/3 {r16 e'8] }
  g16( a \times 2/3 {b d) e' }
  g8[( a \times 2/3 {b d') e'~]}
  \times 4/5 {e'32\( a b d' e'} a'4.\)
}
![[image of music]](3c/lily-24f47144.png)
| [ << Alapfogalmak ] | [Címoldal][Tartalom][Tárgymutató][ ? ] | [ A kimenet finomhangolása >> ] | ||
| [ < A gerendák és ívek átfedhetik egymást ] | [ Fel: Alapfogalmak ] | [ Hangzatos szólamok > ] | ||
3.2 A szólamok zenét tartalmaznak
Singers need voices to sing, and so does LilyPond. The actual music for all instruments in a score is contained in Voices – the most fundamental of all LilyPond’s concepts.
| 3.2.1 Hangzatos szólamok | ||
| 3.2.2 Szólamok kézi létrehozása | ||
| 3.2.3 Szólamok és vokális zene |
| [ << Alapfogalmak ] | [Címoldal][Tartalom][Tárgymutató][ ? ] | [ A kimenet finomhangolása >> ] | ||
| [ < A szólamok zenét tartalmaznak ] | [ Fel: A szólamok zenét tartalmaznak ] | [ Szólamok kézi létrehozása > ] | ||
3.2.1 Hangzatos szólamok
The lowest, most fundamental or innermost layers in a LilyPond score are called ‘Voice contexts’ or just ‘Voices’ for short. Voices are sometimes called ‘layers’ in other notation packages.
In fact, a Voice layer or context is the only one which can contain music. If a Voice context is not explicitly declared one is created automatically, as we saw at the beginning of this chapter. Some instruments such as an Oboe can play only one note at a time. Music written for such instruments is monophonic and requires just a single voice. Instruments which can play more than one note at a time like the piano will often require multiple voices to encode the different concurrent notes and rhythms they are capable of playing.
A single voice can contain many notes in a chord, of course, so when exactly are multiple voices needed? Look first at this example of four chords:
\key g \major
<d g>4 <d fis> <d a'> <d g>
![[image of music]](b0/lily-cea1c302.png)
This can be expressed using just the single angle bracket chord
symbols, < ... >, and for this just a single voice is
needed. But suppose the F-sharp were actually an eighth-note
followed by an eighth-note G, a passing note on the way to the A?
Now we have two notes which start at the same time but have
different durations: the quarter-note D and the eighth-note
F-sharp. How are these to be coded? They cannot be written as
a chord because all the notes in a chord must have the same
duration. And they cannot be written as two sequential notes
as they need to start at the same time. This is when two
voices are required.
Let us see how this is done in LilyPond input syntax.
The easiest way to enter fragments with more than one voice on a
staff is to enter each voice as a sequence (with {...}),
and combine them simultaneously with angle brackets, <<...>>.
The fragments must also be separated with double backward slashes,
\\, to place them in separate voices. Without these, the
notes would be entered into a single voice, which would usually
cause errors. This technique is particularly suited to pieces of
music which are largely monophonic with occasional short sections
of polyphony.
Here’s how we split the chords above into two voices and add both the passing note and a slur:
\key g \major
%    Voice "1"                  Voice "2"
<< { g4 fis8( g) a4 g }  \\  { d4 d d d }  >>
![[image of music]](13/lily-b9eb6110.png)
Notice how the stems of the second voice now point down.
Here’s another simple example:
\key d \minor
%    Voice "1"             Voice "2"
<< { r4 g g4. a8 }    \\ { d,2 d4 g }       >>
<< { bes4 bes c bes } \\ { g4 g g8( a) g4 } >>
<< { a2. r4 }         \\ { fis2. s4 }       >>
![[image of music]](78/lily-7344750b.png)
It is not necessary to use a separate << \\ >> construct
for each bar. For music with few notes in each bar this layout
can help the legibility of the code, but if there are many
notes in each bar it may be better to split out each voice
separately, like this:
\key d \minor
<< {
  % Voice "1"
  r4 g g4. a8 |
  bes4 bes c bes |
  a2. r4 |
} \\ {
  % Voice "2"
  d,2 d4 g |
  g4 g g8( a) g4 |
  fis2. s4 |
} >>
![[image of music]](8c/lily-2e707703.png)
This example has just two voices, but the same construct may be used to encode three or more voices by adding more back-slash separators.
The Voice contexts bear the names "1", "2", etc.
In each of these contexts, the vertical direction of slurs,
stems, ties, dynamics etc., is set appropriately.
\new Staff \relative c' {
  % Main voice
  c16 d e f
  %    Voice "1"     Voice "2"                 Voice "3"
  << { g4 f e } \\ { r8 e4 d c8~ } >>
  << { d2 e2 }  \\ { c8 b16 a b8 g~ g2 } \\ { s4 b4 c2 } >>
}
![[image of music]](87/lily-af80bb51.png)
These voices are all separate from the main voice that contains
the notes just outside the << .. >> construct. Let’s call
this the simultaneous construct. Slurs and ties may only
connect notes within the same voice, so slurs and ties cannot go
into or out of a simultaneous construct. Conversely,
parallel voices from separate simultaneous constructs on the same
staff are the same voice. Other voice-related properties also
carry across simultaneous constructs. Here is the same example,
with different colors and note heads for each voice. Note that
changes in one voice do not affect other voices, but they do
persist in the same voice later. Note also that tied notes may be
split across the same voices in two constructs, shown here in the
blue triangle voice.
\new Staff \relative c' {
  % Main voice
  c16 d e f
  <<  % Bar 1
    {
      \voiceOneStyle
      g4 f e
    }
  \\
    {
      \voiceTwoStyle
      r8 e4 d c8~
    }
  >>
  <<  % Bar 2
     % Voice 1 continues
    { d2 e2 }
  \\
     % Voice 2 continues
    { c8 b16 a b8 g ~ g2 }
  \\
    {
      \voiceThreeStyle
      s4 b4 c2
    }
  >>
}
![[image of music]](2f/lily-d6c259f1.png)
The commands \voiceXXXStyle are mainly intended for use in
educational documents such as this one. They modify the color
of the note head, the stem and the beams, and the style of the
note head, so that the voices may be easily distinguished.
Voice one is set to red diamonds, voice two to blue triangles,
voice three to green crossed circles, and voice four (not used
here) to magenta crosses; \voiceNeutralStyle (also not
used here) reverts the style back to the default.
We shall see later how commands like these may be created by the
user.
See Objektumok láthatósága és színe and
Változók felhasználása a finomhangoláshoz.
Polyphony does not change the relationship of notes within a
\relative { } block. Each note is still calculated
relative to the note immediately preceding it, or to the first
note of the preceding chord. So in
\relative c' { noteA << < noteB noteC > \\ noteD >> noteE }
noteB is relative to noteA
noteC is relative to noteB, not noteA;
noteD is relative to noteB, not noteA or
noteC;
noteE is relative to noteD, not noteA.
An alternative way, which may be clearer if the notes in the
voices are widely separated, is to place a \relative
command at the start of each voice:
\relative c' { noteA ... }
<<
  \relative c'' { < noteB noteC > ... }
\\
  \relative g' { noteD ... }
>>
\relative c' { noteE ... }
Let us finally analyze the voices in a more complex piece of music. Here are the notes from the first two bars of the second of Chopin’s Deux Nocturnes, Op 32. This example will be used at later stages in this and the next chapter to illustrate several techniques for producing notation, so please ignore for now anything in the underlying code which looks mysterious and concentrate just on the music and the voices – the complications will all be explained in later sections.
![[image of music]](03/lily-5766c8af.png)
The direction of the stems is often used to indicate the continuity of two simultaneous melodic lines. Here the stems of the highest notes are all pointing up and the stems of the lower notes are all pointing down. This is the first indication that more than one voice is required.
But the real need for multiple voices arises when notes which start at the same time have different durations. Look at the notes which start at beat three in the first bar. The A-flat is a dotted quarter note, the F is a quarter note and the D-flat is a half note. These cannot be written as a chord as all the notes in a chord must have the same duration. Neither can they be written as sequential notes, as they must start at the same time. This section of the bar requires three voices, and the normal practice would be to write the whole bar as three voices, as shown below, where we have used different note heads and colors for the three voices. Again, the code behind this example will be explained later, so ignore anything you do not understand.
![[image of music]](76/lily-ed6b985e.png)
Let us try to encode this music from scratch. As we
shall see, this encounters some difficulties. We begin as
we have learnt, using the << \\ >> construct to
enter the music of the first bar in three voices:
\new Staff \relative c'' {
  \key aes \major
  <<
    { c2 aes4. bes8 } \\ { aes2 f4 fes } \\ { <ees c>2 des2 }
  >>
  <c ees aes c>1
}
![[image of music]](0c/lily-e5e2e4cd.png)
The stem directions are automatically assigned with the
odd-numbered voices taking upward stems and the even-numbered
voices downward ones. The stems for voices 1 and 2 are right,
but the stems in voice 3 should go down in this particular piece
of music. We can correct this by skipping voice three
and placing the music in voice four. This is done by simply
adding another pair of \\.
\new Staff \relative c'' {
  \key aes \major
  <<  % Voice one
    { c2 aes4. bes8 }
  \\  % Voice two
    { aes2 f4 fes }
  \\  % Omit Voice three
  \\  % Voice four
    { <ees c>2 des2 }
  >>
  <c ees aes c>1
}
![[image of music]](41/lily-51976e10.png)
We see that this fixes the stem direction, but exposes a problem
sometimes encountered with multiple voices – the stems of the notes
in one voice can collide with the note heads in other voices. In
laying out the notes, LilyPond allows the notes or chords from two
voices to occupy the same vertical note column provided the stems are
in opposite directions, but the notes from the third and fourth voices
are displaced, if necessary, to avoid the note heads colliding. This
usually works well, but in this example the notes of the lowest voice
are clearly not well placed by default. LilyPond provides several ways
to adjust the horizontal placing of notes. We are not quite ready yet
to see how to correct this, so we shall leave this problem until a
later section — see the force-hshift property in Egymást átfedő jelek javítása.
Lásd még
Notation Reference: Multiple voices.
| [ << Alapfogalmak ] | [Címoldal][Tartalom][Tárgymutató][ ? ] | [ A kimenet finomhangolása >> ] | ||
| [ < Hangzatos szólamok ] | [ Fel: A szólamok zenét tartalmaznak ] | [ Szólamok és vokális zene > ] | ||
3.2.2 Szólamok kézi létrehozása
Voice contexts can also be created manually
inside a << >> block to create polyphonic music, using
\voiceOne ... \voiceFour to indicate the required
directions of stems, slurs, etc. In longer scores this method
is clearer, as it permits the voices to be separated and to be
given more descriptive names.
Specifically, the construct << \\ >> which we used in
the previous section:
\new Staff {
  \relative c' {
    << { e4 f g a } \\ { c,4 d e f } >>
  }
}
is equivalent to
\new Staff <<
  \new Voice = "1" { \voiceOne \relative c' { e4 f g a } }
  \new Voice = "2" { \voiceTwo \relative c' { c4 d e f } }
>>
Both of the above would produce
![[image of music]](7e/lily-489c4595.png)
The \voiceXXX commands set the direction of stems, slurs,
ties, articulations, text annotations, augmentation dots of dotted
notes, and fingerings. \voiceOne and \voiceThree
make these objects point upwards, while \voiceTwo and
\voiceFour make them point downwards. These commands also
generate a horizontal shift for each voice when this is required
to avoid clashes of note heads. The command \oneVoice
reverts the settings back to the normal values for a single voice.
Let us see in some simple examples exactly what effect
\oneVoice, \voiceOne and voiceTwo have on
markup, ties, slurs, and dynamics:
\relative c'{
  % Default behavior or behavior after \oneVoice
  c d8~ d e4( f g a) b-> c
}
![[image of music]](88/lily-b2beb010.png)
\relative c'{
  \voiceOne
  c d8~ d e4( f g a) b-> c
  \oneVoice
  c, d8~ d e4( f g a) b-> c
}
![[image of music]](06/lily-a98a6a6d.png)
\relative c'{
  \voiceTwo
  c d8~ d e4( f g a) b-> c
  \oneVoice
  c, d8~ d e4( f g a) b-> c
}
![[image of music]](88/lily-641bc5d2.png)
Now let’s look at three different ways to notate the same passage of polyphonic music, each of which is advantageous in different circumstances, using the example from the previous section.
An expression that appears directly inside a << >> belongs
to the main voice (but, note, not in a << \\ >>
construct). This is useful when extra voices appear while the
main voice is playing. Here is a more correct rendition of our
example. The red diamond-shaped notes
demonstrate that the main melody is now in a single voice context,
permitting a phrasing slur to be drawn over them.
\new Staff \relative c' {
  \voiceOneStyle
  % The following notes are monophonic
  c16^( d e f
  % Start simultaneous section of three voices
  <<
    % Continue the main voice in parallel
    { g4 f e | d2 e2) | }
    % Initiate second voice
    \new Voice {
      % Set stems, etc., down
      \voiceTwo
      r8 e4 d c8~ | c8 b16 a b8 g~ g2 |
    }
    % Initiate third voice
    \new Voice {
      % Set stems, etc, up
      \voiceThree
      s2. | s4 b4 c2 |
    }
  >>
}
![[image of music]](47/lily-98c1a3fb.png)
More deeply nested polyphony constructs are possible, and if a voice appears only briefly this might be a more natural way to typeset the music:
\new Staff \relative c' {
  c16^( d e f
  <<
    { g4 f e | d2 e2) | }
    \new Voice {
      \voiceTwo
      r8 e4 d c8~
      <<
        { c8 b16 a b8 g~ g2 }
        \new Voice {
          \voiceThree
          s4 b4 c2
        }
      >>
    }
  >>
}
![[image of music]](1d/lily-aa9e7cf6.png)
This method of nesting new voices briefly is useful when only small sections of the music are polyphonic, but when the whole staff is largely polyphonic it can be clearer to use multiple voices throughout, using spacing notes to step over sections where the voice is silent, as here:
\new Staff \relative c' <<
  % Initiate first voice
  \new Voice {
    \voiceOne
    c16^( d e f g4 f e | d2 e2) |
  }
  % Initiate second voice
  \new Voice {
    % Set stems, etc, down
    \voiceTwo
    s4 r8 e4 d c8~ | c8 b16 a b8 g~ g2 |
  }
  % Initiate third voice
  \new Voice {
    % Set stems, etc, up
    \voiceThree
    s1 | s4 b4 c2 |
  }
>>
![[image of music]](c6/lily-48b87c50.png)
Note columns
Closely spaced notes in a chord, or notes occurring at the same time in different voices, are arranged in two, occasionally more, columns to prevent the note heads overlapping. These are called note columns. There are separate columns for each voice, and the currently specified voice-dependent shift is applied to the note column if there would otherwise be a collision. This can be seen in the example above. In bar 2 the C in voice two is shifted to the right relative to the D in voice one, and in the final chord the C in voice three is also shifted to the right relative to the other notes.
The \shiftOn, \shiftOnn, \shiftOnnn, and
\shiftOff commands specify the degree to which notes and
chords of the voice should be shifted if a collision
would otherwise occur. By default, the outer voices (normally
voices one and two) have \shiftOff specified, while the
inner voices (three and four) have \shiftOn specified.
When a shift is applied, voices one and three are shifted to
the right and voices two and four to the left.
\shiftOnn and \shiftOnnn define further shift
levels which may be specified temporarily to resolve collisions
in complex situations – see Valós zenei példa.
A note column can contain just one note (or chord) from a voice with stems up and one note (or chord) from a voice with stems down. If notes from two voices which have their stems in the same direction are placed at the same position and both voices have no shift or the same shift specified, the error message „Too many clashing note columns” will be produced.
Lásd még
Notation Reference: Multiple voices.
| [ << Alapfogalmak ] | [Címoldal][Tartalom][Tárgymutató][ ? ] | [ A kimenet finomhangolása >> ] | ||
| [ < Szólamok kézi létrehozása ] | [ Fel: A szólamok zenét tartalmaznak ] | [ Kontextusok és ábrázolók > ] | ||
3.2.3 Szólamok és vokális zene
Vocal music presents a special difficulty: we need to combine two expressions – notes and lyrics.
You have already seen the \addlyrics{} command, which
handles simple scores well. However, this technique is
quite limited. For more complex music, you must introduce the
lyrics in a Lyrics context using \new Lyrics and
explicitly link
the lyrics to the notes with \lyricsto{}, using the
name assigned to the Voice.
<<
  \new Voice = "one" \relative c'' {
    \autoBeamOff
    \time 2/4
    c4 b8. a16 g4. f8 e4 d c2
  }
  \new Lyrics \lyricsto "one" {
    No more let sins and sor -- rows grow.
  }
>>
![[image of music]](25/lily-937c1a26.png)
Note that the lyrics must be linked to a Voice context,
not a Staff context. This is a case where it is
necessary to create Staff and Voice contexts
explicitly.
The automatic beaming which LilyPond uses by default works well
for instrumental music, but not so well for music with lyrics,
where beaming is either not required at all or is used to indicate
melismata in the lyrics. In the example above we use the command
\autoBeamOff to turn off the automatic beaming.
Let us reuse the earlier example from Judas Maccabæus to
illustrate this more flexible technique. We first recast
it to use variables so the music and lyrics can be separated
from the staff structure. We also introduce a ChoirStaff
bracket. The lyrics themselves must be introduced with
\lyricmode to ensure they are interpreted as lyrics
rather than music.
global = { \time 6/8 \partial 8 \key f \major}
SopOneMusic = \relative c'' {
  c8 | c([ bes)] a a([ g)] f | f'4. b, | c4.~ c4 | }
SopTwoMusic = \relative c' {
  r8 | r4. r4 c8 | a'([ g)] f f([ e)] d | e([ d)] c bes' | }
SopOneLyrics = \lyricmode {
  Let | flee -- cy flocks the | hills a -- dorn, __ | }
SopTwoLyrics = \lyricmode {
  Let | flee -- cy flocks the | hills a -- dorn, | }

\score {
  \new ChoirStaff <<
    \new Staff <<
      \new Voice = "SopOne" {
        \global
        \SopOneMusic
      }
      \new Lyrics \lyricsto "SopOne" {
        \SopOneLyrics
      }
    >>
    \new Staff <<
      \new Voice = "SopTwo" {
        \global
        \SopTwoMusic
      }
      \new Lyrics \lyricsto "SopTwo" {
        \SopTwoLyrics
      }
    >>
  >>
}
![[image of music]](98/lily-72a84c76.png)
This is the basic structure of all vocal scores. More staves may be added as required, more voices may be added to the staves, more verses may be added to the lyrics, and the variables containing the music can easily be placed in separate files should they become too long.
Here is an example of the first line of a hymn with four verses, set for SATB. In this case the words for all four parts are the same. Note how we use variables to separate the music notation and words from the staff structure. See too how a variable, which we have chosen to call ‘TimeKey’, is used to hold several commands for use within the two staves. In other examples this is often called ‘global’.
TimeKey = { \time 4/4 \partial 4 \key c \major}
SopMusic   = \relative c' { c4 | e4. e8 g4  g  | a a g | }
AltoMusic  = \relative c' { c4 | c4. c8 e4  e  | f f e | }
TenorMusic = \relative c  { e4 | g4. g8 c4. b8 | a8 b c d e4 | }
BassMusic  = \relative c  { c4 | c4. c8 c4  c  | f8 g a b c4 | }
VerseOne   = \lyricmode {
  E -- | ter -- nal fa -- ther, | strong to save, | }
VerseTwo   = \lyricmode {
  O | Christ, whose voice the | wa -- ters heard, | }
VerseThree = \lyricmode {
  O | Ho -- ly Spi -- rit, | who didst brood | }
VerseFour  = \lyricmode {
  O | Tri -- ni -- ty of | love and pow'r | }

\score {
  \new ChoirStaff <<
    \new Staff <<
      \clef "treble"
      \new Voice = "Sop"  { \voiceOne \TimeKey \SopMusic }
      \new Voice = "Alto" { \voiceTwo \AltoMusic }
      \new Lyrics \lyricsto "Sop" { \VerseOne   }
      \new Lyrics \lyricsto "Sop" { \VerseTwo   }
      \new Lyrics \lyricsto "Sop" { \VerseThree }
      \new Lyrics \lyricsto "Sop" { \VerseFour  }
    >>
    \new Staff <<
      \clef "bass"
      \new Voice = "Tenor" { \voiceOne \TimeKey \TenorMusic }
      \new Voice = "Bass"  { \voiceTwo \BassMusic }
    >>
  >>
}
![[image of music]](54/lily-19433911.png)
We end with an example to show how we might code a solo verse which continues into a two-part refrain in two staves. The positioning of the sequential and simultaneous sections to achieve this within a single score is quite tricky, so follow the explanation carefully!
Let’s start with a score block containing a ChoirStaff, as
we would like the brace to appear at the start of the chorus.
Normally you would need angle brackets after \new ChoirStaff
to bring in all the staves in parallel, but here we want to
defer the parallelism during the solo so we use braces, although
angle brackets here wouldn’t hurt. Inside the ChoirStaff we
want first the staff which will contain the verse. This must
contain notes and lyrics in parallel, so here we need angle
brackets around the \new Voice and \new Lyrics to
start them at the same time:
versenotes = \relative c'' {
  \clef "treble"
  \key g \major
  \time 3/4
  g g g | b b b |
}
versewords = \lyricmode {
  One two three four five six
}
\score {
  \new ChoirStaff {
    \new Staff <<
      \new Voice = "verse" {
        \versenotes \break
      }
      \new Lyrics \lyricsto verse {
        \versewords
      }
    >>
  }
}
![[image of music]](8a/lily-75ff2ff0.png)
That gives the verse line.
Now we want to continue with refrainA on the same staff while a
second staff is introduced in parallel with it for refrainB, so
this is a parallel section which must be positioned immediately
following the \break in the verse Voice. Yes, within
the verse Voice! Here’s that parallel section. More staves
could be introduced here in the same way.
<<
  \refrainnotesA
  \new Lyrics \lyricsto verse {
    \refrainwordsA
  }
  \new Staff <<
    \new Voice = "refrainB" {
      \refrainnotesB
    }
    \new Lyrics \lyricsto "refrainB" {
      \refrainwordsB
    }
  >>
>>
Here’s the final result with two staves in the chorus showing how the parallel section is positioned within the verse Voice:
versenotes = \relative c'' {
  \clef "treble"
  \key g \major
  \time 3/4
  g g g | b b b |
}
refrainnotesA = \relative c'' {
  \time 2/4
  c c | g g \bar "|."
}
refrainnotesB = \relative c {
  \clef "bass"
  \key g \major
  c e | d d |
}
versewords = \lyricmode {
  One two three four five six
}
refrainwordsA = \lyricmode {
  la la la la
}
refrainwordsB = \lyricmode {
  dum dum dum dum
}
\score {
  \new ChoirStaff {
    \new Staff <<
      \new Voice = "verse" {
        \versenotes \break
        <<
          \refrainnotesA
          \new Lyrics \lyricsto "verse" {
            \refrainwordsA
          }
          \new Staff <<
            \new Voice = "refrainB" {
              \refrainnotesB
            }
            \new Lyrics \lyricsto "refrainB" {
              \refrainwordsB
            }
          >>
        >>
      }
      \new Lyrics \lyricsto "verse" {
        \versewords
      }
    >>
  }
}
![[image of music]](6b/lily-17d90a15.png)
However, although this is an interesting and useful exercise to
help you to understand how sequential and simultaneous blocks work,
in practice one would perhaps choose to code this as two
\score blocks within an implicit \book block, as
follows:
versenotes = \relative c'' {
  \clef "treble"
  \key g \major
  \time 3/4
  g g g | b b b |
}
refrainnotesA = \relative c'' {
  \time 2/4
  c c | g g \bar "|."
}
refrainnotesB = \relative c {
  \clef "bass"
  \key g \major
  c e | d d |
}
versewords = \lyricmode {
  One two three four five six
}
refrainwordsA = \lyricmode {
  la la la la
}
refrainwordsB = \lyricmode {
  dum dum dum dum
}
\score {
  \new Staff <<
    \new Voice = "verse" {
      \versenotes
    }
    \new Lyrics \lyricsto "verse" {
      \versewords
    }
  >>
}

\score {
  \new ChoirStaff <<
    \new Staff <<
      \new Voice = "refrainA" {
        \refrainnotesA
      }
      \new Lyrics \lyricsto "refrainA" {
        \refrainwordsA
      }
    >>
    \new Staff <<
      \new Voice = "refrainB" {
        \refrainnotesB
      }
      \new Lyrics \lyricsto "refrainB" {
        \refrainwordsB
      }
    >>
  >>
}
![[image of music]](f8/lily-fe5ae754.png)
Lásd még
Notation Reference: Vocal music.
| [ << Alapfogalmak ] | [Címoldal][Tartalom][Tárgymutató][ ? ] | [ A kimenet finomhangolása >> ] | ||
| [ < Szólamok és vokális zene ] | [ Fel: Alapfogalmak ] | [ A kontextus fogalma > ] | ||
3.3 Kontextusok és ábrázolók
Kontextusok és ábrázolók have been mentioned informally in earlier sections; we now must look at these concepts in more detail, as they are important in the fine-tuning of LilyPond output.
| 3.3.1 A kontextus fogalma | ||
| 3.3.2 Kontextusok létrehozása | ||
| 3.3.3 Az ábrázoló fogalma | ||
| 3.3.5 Kontextusok tulajdonságainak módosítása | ||
| 3.3.6 Ábrázolók hozzáadása és eltávolítása |
| [ << Alapfogalmak ] | [Címoldal][Tartalom][Tárgymutató][ ? ] | [ A kimenet finomhangolása >> ] | ||
| [ < Kontextusok és ábrázolók ] | [ Fel: Kontextusok és ábrázolók ] | [ Kontextusok létrehozása > ] | ||
3.3.1 A kontextus fogalma
When music is printed, many notational elements which do not appear explicitly in the input file must be added to the output. For example, compare the input and output of the following example:
cis4 cis2. g4
![[image of music]](9a/lily-968a9331.png)
The input is rather sparse, but in the output, bar lines, accidentals, clef, and time signature have been added. When LilyPond interprets the input the musical information is parsed from left to right, similar to the way a performer reads the score. While reading the input, the program remembers where measure boundaries are, and which pitches require explicit accidentals. This information must be held on several levels. For example, an accidental affects only a single staff, while a bar line must be synchronized across the entire score.
Within LilyPond, these rules and bits of information are grouped in
Contexts. We have already introduced the Voice context.
Others are the Staff and Score contexts. Contexts are
hierarchical to reflect the hierarchical nature of a musical score.
For example: a Staff context can contain many Voice
contexts, and a Score context can contain many Staff
contexts.
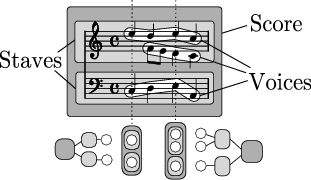
Each context has the responsibility for enforcing some notation rules,
creating some notation objects and maintaining the associated
properties. For example, the Voice context may introduce an
accidental and then the Staff context maintains the rule to
show or suppress the accidental for the remainder of the measure.
As another example, the synchronization of bar lines is, by default,
handled in the Score context.
However, in some music we may not want the bar lines to be
synchronized – consider a polymetric score in 4/4 and 3/4 time.
In such cases, we must modify the default settings of the
Score and Staff contexts.
For very simple scores, contexts are created implicitly, and you need not be aware of them. For larger pieces, such as anything with more than one staff, they must be created explicitly to make sure that you get as many staves as you need, and that they are in the correct order. For typesetting pieces with specialized notation, it is usual to modify existing, or even to define totally new, contexts.
In addition to the Score, Staff and
Voice contexts there are contexts which fit between
the score and staff levels to control staff groups, such as the
PianoStaff and ChoirStaff contexts. There
are also alternative staff and voice contexts, and contexts for
lyrics, percussion, fret boards, figured bass, etc.
The names of all context types are formed from one or more
words, each word being capitalized and joined immediately to the
preceding word with no hyphen or underscore, e.g.,
GregorianTranscriptionStaff.
Lásd még
Notation Reference: A kontextus fogalma.
| [ << Alapfogalmak ] | [Címoldal][Tartalom][Tárgymutató][ ? ] | [ A kimenet finomhangolása >> ] | ||
| [ < A kontextus fogalma ] | [ Fel: Kontextusok és ábrázolók ] | [ Az ábrázoló fogalma > ] | ||
3.3.2 Kontextusok létrehozása
In an input file a score block, introduced with a \score
command, contains a single music expression and an associated
output definition (either a \layout or a \midi block).
The Score context is usually left to be created automatically
when the interpretation of that music expression starts.
For scores with only one voice and one staff, the Voice and
Staff contexts may also be left to be created automatically,
but for more complex scores it is necessary to create them by hand.
The simplest command that does this is \new. It is prepended
to a music expression, for example
\new type music-expression
where type is a context name (like Staff or
Voice). This command creates a new context, and starts
interpreting the music-expression within that context.
(Note that a \new Score command is not normally required,
as the essential top-level Score context is created
automatically when the music expression within the \score
block is interpreted. The only reason for creating a Score
context explicitly using \new Score is to introduce a
\with block in which one or more score-wide default values
of context properties may be specified. Information on using
\with blocks can be found under the heading
„Setting context properties with \with ” in
Kontextusok tulajdonságainak módosítása.)
You have seen many practical examples which created new
Staff and Voice contexts in earlier sections, but
to remind you how these commands are used in practice, here’s an
annotated real-music example:
\score {  % start of single compound music expression
  <<  % start of simultaneous staves section
    \time 2/4
    \new Staff {  % create RH staff
      \key g \minor
      \clef "treble"
      \new Voice {  % create voice for RH notes
        \relative c'' {  % start of RH notes
          d4 ees16 c8.
          d4 ees16 c8.
        }  % end of RH notes
      }  % end of RH voice
    }  % end of RH staff
    \new Staff <<  % create LH staff; needs two simultaneous voices
      \key g \minor
      \clef "bass"
      \new Voice {  % create LH voice one
        \voiceOne
        \relative g {  % start of LH voice one notes
          g8 <bes d> ees, <g c>
          g8 <bes d> ees, <g c>
        }  % end of LH voice one notes
      }  % end of LH voice one
      \new Voice {  % create LH voice two
        \voiceTwo
        \relative g {  % start of LH voice two notes
          g4 ees
          g4 ees
        }  % end of LH voice two notes
      }  % end of LH voice two
    >>  % end of LH staff
  >>  % end of simultaneous staves section
}  % end of single compound music expression
![[image of music]](a5/lily-dab01edf.png)
(Note how all the statements which open a block with either a
curly bracket, {, or double angle brackets, <<,
are indented by two further spaces, and the corresponding
closing bracket is indented by exactly the same amount. While
this is not required, following this practice will greatly
reduce the number of ‘unmatched bracket’ errors, and is
strongly recommended. It enables the structure of the music to
be seen at a glance, and any unmatched brackets will be obvious.
Note too how the LH staff is created using double angle brackets
because it requires two voices for its music, whereas the RH staff
is created with a single music expression surrounded by curly
brackets because it requires only one voice.)
The \new command may also give an identifying name to the
context to distinguish it from other contexts of the same type,
\new type = id music-expression
Note the distinction between the name of the context type,
Staff, Voice, etc, and the identifying name of a
particular instance of that type, which can be any sequence of letters
invented by the user. Digits and spaces can also be used in the
identifying name, but then it has to be placed in quotes,
i.e. \new Staff = "MyStaff 1" music-expression.
The identifying name is used to
refer back to that particular instance of a context. We saw this in
use in the section on lyrics, see Szólamok és vokális zene.
Lásd még
Notation Reference: Kontextusok létrehozása.
| [ << Alapfogalmak ] | [Címoldal][Tartalom][Tárgymutató][ ? ] | [ A kimenet finomhangolása >> ] | ||
| [ < Kontextusok létrehozása ] | [ Fel: Kontextusok és ábrázolók ] | [ > ] | ||
3.3.3 Az ábrázoló fogalma
| [ << Alapfogalmak ] | [Címoldal][Tartalom][Tárgymutató][ ? ] | [ A kimenet finomhangolása >> ] | ||
| [ < Az ábrázoló fogalma ] | [ Fel: Kontextusok és ábrázolók ] | [ Kontextusok tulajdonságainak módosítása > ] | ||
3.3.4 Az ábrázoló fogalma
Every mark on the printed output of a score produced by LilyPond
is produced by an Engraver. Thus there is an engraver
to print staves, one to print note heads, one for stems, one for
beams, etc, etc. In total there are over 120 such engravers!
Fortunately, for most scores it is not necessary to know about
more than a few, and for simple scores you do not need to know
about any.
Engravers live and operate in Contexts. Engravers such as the
Metronome_mark_engraver, whose action and output apply to the
score as a whole, operate in the highest level context – the
Score context.
The Clef_engraver and Key_engraver are to be
found in every Staff Context, as different staves may require
different clefs and keys.
The Note_heads_engraver and Stem_engraver live
in every Voice context, the lowest level context of all.
Each engraver processes the particular objects associated with its function, and maintains the properties that relate to that function. These properties, like the properties associated with contexts, may be modified to change the operation of the engraver or the appearance of those elements in the printed score.
Engravers all have compound names formed from words which
describe their function. Just the first word is capitalized,
and the remainder are joined to it with underscores. Thus
the Staff_symbol_engraver is responsible for creating the
lines of the staff, the Clef_engraver determines and sets
the pitch reference point on the staff by drawing a clef symbol.
Here are some of the most common engravers together with their function. You will see it is usually easy to guess the function from the name, or vice versa.
Engraver | Function |
|---|---|
Accidental_engraver | Makes accidentals, cautionary and suggested accidentals |
Beam_engraver | Engraves beams |
Clef_engraver | Engraves clefs |
Completion_heads_engraver | Splits notes which cross bar lines |
New_dynamic_engraver | Creates hairpins and dynamic texts |
Forbid_line_break_engraver | Prevents line breaks if a musical element is still active |
Key_engraver | Creates the key signature |
Metronome_mark_engraver | Engraves metronome marking |
Note_heads_engraver | Engraves note heads |
Rest_engraver | Engraves rests |
Staff_symbol_engraver | Engraves the five (by default) lines of the staff |
Stem_engraver | Creates stems and single-stem tremolos |
Time_signature_engraver | Creates time signatures |
We shall see later how the output of LilyPond can be changed by modifying the action of Engravers.
Lásd még
Internals reference: Engravers and Performers.
| [ << Alapfogalmak ] | [Címoldal][Tartalom][Tárgymutató][ ? ] | [ A kimenet finomhangolása >> ] | ||
| [ < ] | [ Fel: Kontextusok és ábrázolók ] | [ Ábrázolók hozzáadása és eltávolítása > ] | ||
3.3.5 Kontextusok tulajdonságainak módosítása
Contexts are responsible for holding the values of a number of
context properties. Many of them can be changed to
influence the interpretation of the input and so change the
appearance of the output. They are changed by the
\set command. This takes the form
\set ContextName.propertyName = #value
Where the ContextName is usually Score,
Staff or Voice. It may be omitted,
in which case the current context (typically Voice) is assumed.
The names of context properties consist of words joined together with no hyphens or underscores, all except the first having a capital letter. Here are a few examples of some commonly used ones. There are many more.
propertyName | Type | Function | Example Value |
|---|---|---|---|
extraNatural | Boolean | If true, set extra natural signs before accidentals | |
currentBarNumber | Integer | Set the current bar number | |
doubleSlurs | Boolean | If true, print slurs both above and below notes | |
instrumentName | Text | Set the name to be placed at the start of the staff | |
fontSize | Real | Increase or decrease the font size | |
stanza | Text | Set the text to print before the start of a verse | |
where a Boolean is either True (#t) or False (#f),
an Integer is a positive whole number, a Real is a positive
or negative decimal number, and text is enclosed in double
apostrophes. Note the occurrence of hash signs,
(#), in two different places – as part of the Boolean
value before the t or f, and before value
in the \set statement. So when a Boolean is being
entered you need to code two hash signs, e.g., ##t.
Before we can set any of these properties we need to know
in which context they operate. Sometimes this is obvious,
but occasionally it can be tricky. If the wrong context
is specified, no error message is produced, but the expected
action will not take place. For example, the
instrumentName clearly lives in the Staff context, since
it is the staff that is to be named.
In this example the first staff is labelled, but not the second,
because we omitted the context name.
<<
  \new Staff \relative c'' {
    \set Staff.instrumentName = #"Soprano"
    c4 c
 }
  \new Staff \relative c' {
  \set instrumentName = #"Alto"  % Wrong!
  d4 d
 }
>>
![[image of music]](8f/lily-bb1d26c2.png)
Remember the default context name is Voice, so the second
\set command set the property instrumentName in the
Voice context to „Alto”, but as LilyPond does not look
for any such property in the Voice context, no
further action took place. This is not an error, and no error
message is logged in the log file.
Similarly, if the property name is mis-spelt no error message is
produced, and clearly the expected action cannot be performed. In
fact, you can set any (fictitious) ‘property’ using any name you
like in any context that exists by using the \set command. But
if the name is not known to LilyPond it will not cause any action to
be taken. Some text editors with special support for LilyPond input
files document property names with bullets when you hover them with
the mouse, like JEdit with LilyPondTool, or highlight unknown property
names differently, like ConTEXT. If you do not use an editor with
such features, it is recommended to check the property name in the
Internals Reference: see
Tunable context properties, or
Contexts.
The instrumentName property will take effect only
if it is set in the Staff context, but
some properties can be set in more than one context.
For example, the property extraNatural is by
default set to ##t (true) for all staves.
If it is set to ##f (false) in one particular Staff
context it applies just to the accidentals on that staff.
If it is set to false in the Score context
it applies to all staves.
So this turns off extra naturals in one staff:
<<
  \new Staff \relative c'' {
    ais4 aes
  }
  \new Staff \relative c'' {
    \set Staff.extraNatural = ##f
    ais4 aes
  }
>>
![[image of music]](4e/lily-45575cde.png)
and this turns them off in all staves:
<<
  \new Staff \relative c'' {
    ais4 aes
  }
  \new Staff \relative c'' {
    \set Score.extraNatural = ##f
    ais4 aes
  }
>>
![[image of music]](94/lily-37877249.png)
As another example, if clefOctavation is set in
the Score context this immediately changes the value
of the octavation in all current staves and sets a new default
value which will be applied to all staves.
The opposite command, \unset, effectively removes the
property from the context, which causes most properties to
revert to their default value. Usually \unset is not
required as a new \set command will achieve what is
wanted.
The \set and \unset commands can appear anywhere
in the input file and will take effect from the time they are
encountered until the end of the score or until the property is
\set or \unset again. Let’s try changing the
font size, which affects the size of the note heads (among
other things) several times. The change is from the default
value, not the most recently set value.
c4
% make note heads smaller
\set fontSize = #-4
d e
% make note heads larger
\set fontSize = #2.5
f g
% return to default size
\unset fontSize
a b
![[image of music]](fc/lily-11625b74.png)
We have now seen how to set the values of several different types of
property. Note that integers and numbers are always preceded by a
hash sign, #, while a true or false value is specified by
##t and ##f, with two hash signs. A text property
should be enclosed in double quotation signs, as above, although we
shall see later that text can actually be specified in a much more
general way by using the very powerful \markup command.
Setting context properties with \with
The default value of context properties may be set at the time the
context is created. Sometimes this is a clearer way of setting a
property value if it is to remain fixed for the duration of
the context. When a context is created with a \new
command it may be followed immediately by a \with { .. }
block in which the default property values are set. For example,
if we wish to suppress the printing of extra naturals for the
duration of a staff we would write:
\new Staff \with { extraNatural = ##f }
like this:
<<
  \new Staff
  \relative c'' {
    gis ges aes ais
  }
  \new Staff \with { extraNatural = ##f }
  \relative c'' {
    gis ges aes ais
  }
>>
![[image of music]](d9/lily-ad094ad3.png)
Or, if the property override is to be applied to all staves
within the score, it may be appended to an explicit
\new Score command, like this:
\score {
  \new Score \with { extraNatural = ##f } <<
    \new Staff {
      \relative c'' {
        gis ges aes ais
      }
    }
    \new Staff {
      \relative c'' {
        gis ges aes ais
      }
    }
  >>
}
![[image of music]](b1/lily-81555ede.png)
Properties set in this way may still be changed dynamically using
\set and returned to the default value set in the
\with block with \unset.
So if the fontSize property is set in a \with clause
it sets the default value of the font size. If it is later changed
with \set, this new default value may be restored with the
\unset fontSize command.
Setting context properties with \context
The values of context properties may be set in all contexts
of a particular type, such as all Staff contexts, with a single
command. The context type is identified by using its
type name, like Staff, prefixed by a back-slash: \Staff.
The statement which sets the property value is the same as that in a
\with block, introduced above. It is placed in a
\context block within a \layout block. Each
\context block will affect all contexts of the type specified
throughout the \score or \book block in which the
\layout block appears. Here is a example to show the format:
\score {
  \new Staff {
    \relative c'' {
      cis4 e d ces
    }
  }
  \layout {
    \context {
      \Staff
      extraNatural = ##t
    }
  }
}
![[image of music]](ed/lily-7cc2fb92.png)
Context properties set in this way may be overridden for particular
instances of contexts by statements in a \with block, and by
\set commands embedded in music statements.
Lásd még
Notation Reference: Changing context default settings. The set command.
Internals Reference: Contexts, Tunable context properties.
| [ << Alapfogalmak ] | [Címoldal][Tartalom][Tárgymutató][ ? ] | [ A kimenet finomhangolása >> ] | ||
| [ < Kontextusok tulajdonságainak módosítása ] | [ Fel: Kontextusok és ábrázolók ] | [ A sablonok kibővítése > ] | ||
3.3.6 Ábrázolók hozzáadása és eltávolítása
We have seen that contexts each contain several engravers, each of which is responsible for producing a particular part of the output, like bar lines, staves, note heads, stems, etc. If an engraver is removed from a context, it can no longer produce its output. This is a crude way of modifying the output, but it can sometimes be useful.
Changing a single context
To remove an engraver from a single context we use the
\with command placed immediately after the context creation
command, as in the previous section.
As an illustration, let’s repeat an example from the previous section
with the staff lines removed. Remember that the staff lines are
produced by the Staff_symbol_engraver.
\new Staff \with {
  \remove Staff_symbol_engraver
}
\relative c' {
  c4
  \set fontSize = #-4  % make note heads smaller
  d e
  \set fontSize = #2.5  % make note heads larger
  f g
  \unset fontSize  % return to default size
  a b
}
![[image of music]](5f/lily-9160a28c.png)
Engravers can also be added to individual contexts. The command to do this is
\consists Engraver_name,
placed inside a \with block. Some vocal scores have an ambitus
placed at the beginning of a staff to indicate the range of notes in
that staff – see
ambitus. The ambitus is produced by the
Ambitus_engraver, which is not normally included in any
context. If we add it to the Voice context, it calculates the
range from that voice only:
\new Staff <<
  \new Voice \with {
    \consists Ambitus_engraver
  }
  \relative c'' {
    \voiceOne
    c a b g
  }
  \new Voice
  \relative c' {
    \voiceTwo
    c e d f
  }
>>
![[image of music]](67/lily-611b3dee.png)
but if we add the ambitus engraver to the
Staff context, it calculates the range from all
the notes in all the voices on that staff:
\new Staff \with {
    \consists Ambitus_engraver
  }
  <<
  \new Voice
  \relative c'' {
    \voiceOne
    c a b g
  }
  \new Voice
  \relative c' {
    \voiceTwo
    c e d f
  }
>>
![[image of music]](4e/lily-fa9ff881.png)
Changing all contexts of the same type
The examples above show how to remove or add engravers to
individual contexts. It is also possible to remove or add
engravers to every context of a specific type by placing the
commands in the appropriate context in a \layout
block. For example, if we wanted to show an ambitus for every
staff in a four-staff score, we could write
\score {
  <<
    \new Staff <<
      \relative c'' {
        c a b g
      }
    >>
    \new Staff <<
      \relative c' {
        c a b g
      }
    >>
    \new Staff <<
      \clef "G_8"
      \relative c' {
        c a b g
      }
    >>
    \new Staff <<
      \clef "bass"
      \relative c {
        c a b g
      }
    >>
  >>
  \layout {
    \context {
      \Staff
      \consists Ambitus_engraver
    }
  }
}
![[image of music]](bb/lily-f34b7662.png)
The values of context properties may also be set
for all contexts of a particular type by including the
\set command in a \context block in the
same way.
Lásd még
Notation Reference: Modifying context plug-ins, Changing context default settings.
| [ << Alapfogalmak ] | [Címoldal][Tartalom][Tárgymutató][ ? ] | [ A kimenet finomhangolása >> ] | ||
| [ < Ábrázolók hozzáadása és eltávolítása ] | [ Fel: Alapfogalmak ] | [ Szoprán és cselló > ] | ||
3.4 A sablonok kibővítése
You’ve read the tutorial, you know how to write music, you understand the fundamental concepts. But how can you get the staves that you want? Well, you can find lots of templates (see Sablonok) which may give you a start. But what if you want something that isn’t covered there? Read on.
| 3.4.1 Szoprán és cselló | ||
| 3.4.2 Négyszólamú vegyeskar | ||
| 3.4.3 Kotta létrehozása az alapoktól | ||
| 3.4.4 Kevesebb gépelés változókkal és függvényekkel | ||
| 3.4.5 Partitúra és szólamkották |
| [ << Alapfogalmak ] | [Címoldal][Tartalom][Tárgymutató][ ? ] | [ A kimenet finomhangolása >> ] | ||
| [ < A sablonok kibővítése ] | [ Fel: A sablonok kibővítése ] | [ Négyszólamú vegyeskar > ] | ||
3.4.1 Szoprán és cselló
Start off with the template that seems closest to what you want to end up with. Let’s say that you want to write something for soprano and cello. In this case, we would start with the ‘Notes and lyrics’ template (for the soprano part).
\version "2.13.45"
melody = \relative c' {
  \clef treble
  \key c \major
  \time 4/4
  a4 b c d
}

text = \lyricmode {
  Aaa Bee Cee Dee
}

\score {
  <<
    \new Voice = "one" {
      \autoBeamOff
      \melody
    }
    \new Lyrics \lyricsto "one" \text
  >>
  \layout { }
  \midi { }
}
Now we want to add a cello part. Let’s look at the ‘Notes only’ example:
\version "2.13.45"
melody = \relative c' {
  \clef treble
  \key c \major
  \time 4/4
  a4 b c d
}

\score {
  \new Staff \melody
  \layout { }
  \midi { }
}
We don’t need two \version commands. We’ll need the
melody section. We don’t want two \score sections
– if we had two \scores, we’d get the two parts separately.
We want them together, as a duet. Within the \score
section, we don’t need two \layout or \midi.
If we simply cut and paste the melody section, we would
end up with two melody definitions. This would not generate
an error, but the second one would be used for both melodies.
So let’s rename them to make them distinct. We’ll call the
section for the soprano sopranoMusic and the section for
the cello celloMusic. While we’re doing this, let’s rename
text to be sopranoLyrics. Remember to rename both
instances of all these names – both the initial definition (the
melody = \relative c' { part) and the name’s use (in the
\score section).
While we’re doing this, let’s change the cello part’s staff – celli normally use bass clef. We’ll also give the cello some different notes.
\version "2.13.45"
sopranoMusic = \relative c' {
  \clef treble
  \key c \major
  \time 4/4
  a4 b c d
}

sopranoLyrics = \lyricmode {
  Aaa Bee Cee Dee
}

celloMusic = \relative c {
  \clef bass
  \key c \major
  \time 4/4
  d4 g fis8 e d4
}

\score {
  <<
    \new Voice = "one" {
      \autoBeamOff
      \sopranoMusic
    }
    \new Lyrics \lyricsto "one" \sopranoLyrics
  >>
  \layout { }
  \midi { }
}
This is looking promising, but the cello part won’t appear in the
score – we haven’t used it in the \score section. If we
want the cello part to appear under the soprano part, we need to add
\new Staff \celloMusic
underneath the soprano stuff. We also need to add << and
>> around the music – that tells LilyPond that there’s
more than one thing (in this case, two Staves) happening
at once. The \score looks like this now:
\score {
  <<
    <<
      \new Voice = "one" {
        \autoBeamOff
        \sopranoMusic
      }
      \new Lyrics \lyricsto "one" \sopranoLyrics
    >>
    \new Staff \celloMusic
  >>
  \layout { }
  \midi { }
}
This looks a bit messy; the indentation is messed up now. That is easily fixed. Here’s the complete soprano and cello template.
\version "2.13.45"sopranoMusic = \relative c' { \clef treble \key c \major \time 4/4 a4 b c d } sopranoLyrics = \lyricmode { Aaa Bee Cee Dee } celloMusic = \relative c { \clef bass \key c \major \time 4/4 d4 g fis8 e d4 } \score { << << \new Voice = "one" { \autoBeamOff \sopranoMusic } \new Lyrics \lyricsto "one" \sopranoLyrics >> \new Staff \celloMusic >> \layout { } \midi { } }
![[image of music]](e7/lily-ad53837d.png)
Lásd még
The starting templates can be found in the ‘Templates’ appendix, see Egy kottasor.
| [ << Alapfogalmak ] | [Címoldal][Tartalom][Tárgymutató][ ? ] | [ A kimenet finomhangolása >> ] | ||
| [ < Szoprán és cselló ] | [ Fel: A sablonok kibővítése ] | [ Kotta létrehozása az alapoktól > ] | ||
3.4.2 Négyszólamú vegyeskar
Most vocal scores of music written for four-part mixed choir with orchestral accompaniment such as Mendelssohn’s Elijah or Handel’s Messiah have the choral music and words on four staves, one for each of SATB, with a piano reduction of the orchestral accompaniment underneath. Here’s an example from Handel’s Messiah:
![[image of music]](c0/lily-fa959827.png)
None of the templates provides this layout exactly. The nearest is ‘SATB vocal score and automatic piano reduction’ – see Kórus – but we need to change the layout and add a piano accompaniment which is not derived automatically from the vocal parts. The variables holding the music and words for the vocal parts are fine, but we shall need to add variables for the piano reduction.
The order in which the contexts appear in the ChoirStaff of the
template do not correspond with the order in the vocal score shown
above. We need to rearrange them so there are four staves with the
words written directly underneath the notes for each part. All the
voices should be \voiceOne, which is the default, so the
\voiceXXX commands should be removed. We also need to specify
the tenor clef for the tenors. The way in which lyrics are specified
in the template has not yet been encountered so we need to use the
method with which we are familiar. We should also add the names of
each staff.
Doing this gives for our ChoirStaff:
    \new ChoirStaff <<
      \new Staff = "sopranos" <<
        \set Staff.instrumentName = #"Soprano"
        \new Voice = "sopranos" {
          \global
          \sopranoMusic
        }
      >>
      \new Lyrics \lyricsto "sopranos" {
        \sopranoWords
     }
      \new Staff = "altos" <<
        \set Staff.instrumentName = #"Alto"
        \new Voice = "altos" {
          \global
          \altoMusic
        }
      >>
      \new Lyrics \lyricsto "altos" {
        \altoWords
      }
      \new Staff = "tenors" <<
        \set Staff.instrumentName = #"Tenor"
        \new Voice = "tenors" {
          \global
          \tenorMusic
        }
      >>
      \new Lyrics \lyricsto "tenors" {
        \tenorWords
      }
      \new Staff = "basses" <<
        \set Staff.instrumentName = #"Bass"
        \new Voice = "basses" {
          \global
          \bassMusic
        }
      >>
      \new Lyrics \lyricsto "basses" {
        \bassWords
      }
    >>  % end ChoirStaff
Next we must work out the piano part. This is easy - we just pull out the piano part from the ‘Solo piano’ template:
\new PianoStaff <<
  \set PianoStaff.instrumentName = #"Piano  "
  \new Staff = "upper" \upper
  \new Staff = "lower" \lower
>>
and add the variable definitions for upper
and lower.
The ChoirStaff and PianoStaff must be combined using angle brackets as we want them to be stacked one above the other:
<<  % combine ChoirStaff and PianoStaff one above the other
  \new ChoirStaff <<
    \new Staff = "sopranos" <<
      \new Voice = "sopranos" {
        \global
        \sopranoMusic
      }
    >>
    \new Lyrics \lyricsto "sopranos" {
      \sopranoWords
     }
    \new Staff = "altos" <<
      \new Voice = "altos" {
        \global
        \altoMusic
      }
    >>
    \new Lyrics \lyricsto "altos" {
      \altoWords
    }
    \new Staff = "tenors" <<
      \clef "G_8"  % tenor clef
      \new Voice = "tenors" {
        \global
        \tenorMusic
      }
    >>
    \new Lyrics \lyricsto "tenors" {
      \tenorWords
    }
    \new Staff = "basses" <<
      \clef "bass"
      \new Voice = "basses" {
        \global
        \bassMusic
      }
    >>
    \new Lyrics \lyricsto "basses" {
      \bassWords
    }
  >>  % end ChoirStaff

  \new PianoStaff <<
    \set PianoStaff.instrumentName = #"Piano"
    \new Staff = "upper" \upper
    \new Staff = "lower" \lower
  >>
>>
Combining all these together and adding the music for the three bars of the example above gives:
\version "2.13.45"global = { \key d \major \time 4/4 } sopranoMusic = \relative c'' { \clef "treble" r4 d2 a4 | d4. d8 a2 | cis4 d cis2 | } sopranoWords = \lyricmode { Wor -- thy is the lamb that was slain } altoMusic = \relative a' { \clef "treble" r4 a2 a4 | fis4. fis8 a2 | g4 fis fis2 | } altoWords = \sopranoWords tenorMusic = \relative c' { \clef "G_8" r4 fis2 e4 | d4. d8 d2 | e4 a, cis2 | } tenorWords = \sopranoWords bassMusic = \relative c' { \clef "bass" r4 d2 cis4 | b4. b8 fis2 | e4 d a'2 | } bassWords = \sopranoWords upper = \relative a' { \clef "treble" \global r4 <a d fis>2 <a e' a>4 <d fis d'>4. <d fis d'>8 <a d a'>2 <g cis g'>4 <a d fis> <a cis e>2 } lower = \relative c, { \clef "bass" \global <d d'>4 <d d'>2 <cis cis'>4 <b b'>4. <b' b'>8 <fis fis'>2 <e e'>4 <d d'> <a' a'>2 } \score { << % combine ChoirStaff and PianoStaff in parallel \new ChoirStaff << \new Staff = "sopranos" << \set Staff.instrumentName = #"Soprano" \new Voice = "sopranos" { \global \sopranoMusic } >> \new Lyrics \lyricsto "sopranos" { \sopranoWords } \new Staff = "altos" << \set Staff.instrumentName = #"Alto" \new Voice = "altos" { \global \altoMusic } >> \new Lyrics \lyricsto "altos" { \altoWords } \new Staff = "tenors" << \set Staff.instrumentName = #"Tenor" \new Voice = "tenors" { \global \tenorMusic } >> \new Lyrics \lyricsto "tenors" { \tenorWords } \new Staff = "basses" << \set Staff.instrumentName = #"Bass" \new Voice = "basses" { \global \bassMusic } >> \new Lyrics \lyricsto "basses" { \bassWords } >> % end ChoirStaff \new PianoStaff << \set PianoStaff.instrumentName = #"Piano " \new Staff = "upper" \upper \new Staff = "lower" \lower >> >> }
![[image of music]](5a/lily-80aa9389.png)
| [ << Alapfogalmak ] | [Címoldal][Tartalom][Tárgymutató][ ? ] | [ A kimenet finomhangolása >> ] | ||
| [ < Négyszólamú vegyeskar ] | [ Fel: A sablonok kibővítése ] | [ Kevesebb gépelés változókkal és függvényekkel > ] | ||
3.4.3 Kotta létrehozása az alapoktól
After gaining some facility with writing LilyPond code, you may find that it is easier to build a score from scratch rather than modifying one of the templates. You can also develop your own style this way to suit the sort of music you like. Let’s see how to put together the score for an organ prelude as an example.
We begin with a header section. Here go the title, name of composer, etc, then come any variable definitions, and finally the score block. Let’s start with these in outline and fill in the details later.
We’ll use the first two bars of Bach’s prelude based on Jesu, meine Freude which is written for two manuals and pedal organ. You can see these two bars of music at the bottom of this section. The top manual part has two voices, the lower and pedal organ one each. So we need four music definitions and one to define the time signature and key:
\version "2.13.45"
\header {
  title = "Jesu, meine Freude"
  composer = "J S Bach"
}
TimeKey = {
  \time 4/4
  \key c \minor
}
ManualOneVoiceOneMusic = { s1 }
ManualOneVoiceTwoMusic = { s1 }
ManualTwoMusic = { s1 }
PedalOrganMusic = { s1 }

\score {
}
For now we’ve just used a spacer note, s1,
instead of the real music. We’ll add that later.
Next let’s see what should go in the score block. We simply mirror the staff structure we want. Organ music is usually written on three staves, one for each manual and one for the pedals. The manual staves should be bracketed together, so we need to use a PianoStaff for them. The first manual part needs two voices and the second manual part just one.
  \new PianoStaff <<
    \new Staff = "ManualOne" <<
      \new Voice {
        \ManualOneVoiceOneMusic
      }
      \new Voice {
        \ManualOneVoiceTwoMusic
      }
    >>  % end ManualOne Staff context
    \new Staff = "ManualTwo" <<
      \new Voice {
        \ManualTwoMusic
      }
    >>  % end ManualTwo Staff context
  >>  % end PianoStaff context
Next we need to add a staff for the pedal organ. This goes underneath the PianoStaff, but it must be simultaneous with it, so we need angle brackets around the two. Missing these out would generate an error in the log file. It’s a common mistake which you’ll make sooner or later! Try copying the final example at the end of this section, remove these angle brackets, and compile it to see what errors it generates.
<<  % PianoStaff and Pedal Staff must be simultaneous
  \new PianoStaff <<
    \new Staff = "ManualOne" <<
      \new Voice {
        \ManualOneVoiceOneMusic
      }
      \new Voice {
        \ManualOneVoiceTwoMusic
      }
    >>  % end ManualOne Staff context
    \new Staff = "ManualTwo" <<
      \new Voice {
        \ManualTwoMusic
      }
    >>  % end ManualTwo Staff context
  >>  % end PianoStaff context
  \new Staff = "PedalOrgan" <<
    \new Voice {
      \PedalOrganMusic
    }
  >>
>>
It is not necessary to use the simultaneous construct
<< .. >> for the manual two staff and the pedal organ staff,
since they contain only one music expression, but it does no harm,
and always using angle brackets after \new Staff is a good
habit to cultivate in case there are multiple voices. The opposite
is true for Voices: these should habitually be followed by braces
{ .. } in case your music is coded in several variables
which need to run consecutively.
Let’s add this structure to the score block, and adjust the indenting.
We also add the appropriate clefs, ensure stems, ties and slurs in
each voice on the upper staff point to the right direction with
\voiceOne and \voiceTwo, and enter the time signature
and key to each staff using our predefined variable, \TimeKey.
\score {
  <<  % PianoStaff and Pedal Staff must be simultaneous
    \new PianoStaff <<
      \new Staff = "ManualOne" <<
        \TimeKey  % set time signature and key
        \clef "treble"
        \new Voice {
          \voiceOne
          \ManualOneVoiceOneMusic
        }
        \new Voice {
          \voiceTwo
          \ManualOneVoiceTwoMusic
        }
      >>  % end ManualOne Staff context
      \new Staff = "ManualTwo" <<
        \TimeKey
        \clef "bass"
        \new Voice {
          \ManualTwoMusic
        }
      >>  % end ManualTwo Staff context
    >>  % end PianoStaff context
    \new Staff = "PedalOrgan" <<
      \TimeKey
      \clef "bass"
      \new Voice {
        \PedalOrganMusic
      }
    >>  % end PedalOrgan Staff
  >>
}  % end Score context
That completes the structure. Any three-staff organ music will have a similar structure, although the number of voices may vary. All that remains now is to add the music, and combine all the parts together.
\version "2.13.45"\header { title = "Jesu, meine Freude" composer = "J S Bach" } TimeKey = { \time 4/4 \key c \minor } ManualOneVoiceOneMusic = \relative g' { g4 g f ees d2 c2 } ManualOneVoiceTwoMusic = \relative c' { ees16 d ees8~ ees16 f ees d c8 d~ d c~ c c4 b8 c8. g16 c b c d } ManualTwoMusic = \relative c' { c16 b c8~ c16 b c g a8 g~ g16 g aes ees f ees f d g aes g f ees d e8~ ees16 f ees d } PedalOrganMusic = \relative c { r8 c16 d ees d ees8~ ees16 a, b g c b c8 r16 g ees f g f g8 c,2 } \score { << % PianoStaff and Pedal Staff must be simultaneous \new PianoStaff << \new Staff = "ManualOne" << \TimeKey % set time signature and key \clef "treble" \new Voice { \voiceOne \ManualOneVoiceOneMusic } \new Voice { \voiceTwo \ManualOneVoiceTwoMusic } >> % end ManualOne Staff context \new Staff = "ManualTwo" << \TimeKey \clef "bass" \new Voice { \ManualTwoMusic } >> % end ManualTwo Staff context >> % end PianoStaff context \new Staff = "PedalOrgan" << \TimeKey \clef "bass" \new Voice { \PedalOrganMusic } >> % end PedalOrgan Staff context >> } % end Score context
![[image of music]](a4/lily-24a98b54.png)
| [ << Alapfogalmak ] | [Címoldal][Tartalom][Tárgymutató][ ? ] | [ A kimenet finomhangolása >> ] | ||
| [ < Kotta létrehozása az alapoktól ] | [ Fel: A sablonok kibővítése ] | [ Partitúra és szólamkották > ] | ||
3.4.4 Kevesebb gépelés változókkal és függvényekkel
By this point, you’ve seen this kind of thing:
hornNotes = \relative c'' { c4 b dis c }
\score {
  {
    \hornNotes
  }
}
![[image of music]](fe/lily-b6be6edf.png)
You may even realize that this could be useful in minimalist music:
fragmentA = \relative c'' { a4 a8. b16 }
fragmentB = \relative c'' { a8. gis16 ees4 }
violin = \new Staff {
  \fragmentA
  \fragmentA
  \fragmentB
  \fragmentA
}
\score {
  {
    \violin
  }
}
![[image of music]](f4/lily-9c894b69.png)
However, you can also use these variables (also known as macros, or user-defined commands) for tweaks:
dolce = \markup { \italic \bold dolce }
padText = { \once \override TextScript #'padding = #5.0 }
fthenp=_\markup { \dynamic f \italic \small { 2nd } \hspace #0.1 \dynamic p }
violin = \relative c'' {
  \repeat volta 2 {
    c4._\dolce b8 a8 g a b
    \padText
    c4.^"hi there!" d8 e' f g d
    c,4.\fthenp b8 c4 c-.
  }
}
\score {
  {
    \violin
  }
\layout { ragged-right=##t }
}
![[image of music]](fc/lily-a12b6c70.png)
These variables are obviously useful for saving typing. But they’re worth considering even if you only use them once – they reduce complexity. Let’s look at the previous example without any variables. It’s a lot harder to read, especially the last line.
violin = \relative c'' {
  \repeat volta 2 {
    c4._\markup { \italic \bold dolce } b8 a8 g a b
    \once \override TextScript #'padding = #5.0
    c4.^"hi there!" d8 e' f g d
    c,4.\markup { \dynamic f \italic \small { 2nd }
      \hspace #0.1 \dynamic p }
    b8 c4 c-.
  }
}
So far we’ve seen static substitution – when LilyPond
sees \padText, it replaces it with the stuff that
we’ve defined it to be (ie the stuff to the right of
padtext=).
LilyPond can handle non-static substitution, too (you can think of these as functions).
padText =
#(define-music-function (parser location padding) (number?)
  #{
    \once \override TextScript #'padding = #$padding
  #})

\relative c''' {
  c4^"piu mosso" b a b
  \padText #1.8
  c4^"piu mosso" d e f
  \padText #2.6
  c4^"piu mosso" fis a g
}
![[image of music]](95/lily-e5848fb4.png)
Using variables is also a good way to reduce work if the
LilyPond input syntax changes (see
Updating files with convert-ly). If
you have a single definition (such as \dolce) for all your
input files (see Stíluslapok), then if the syntax changes, you
only need to update your single \dolce definition,
instead of making changes throughout every ‘.ly’ file.
| [ << Alapfogalmak ] | [Címoldal][Tartalom][Tárgymutató][ ? ] | [ A kimenet finomhangolása >> ] | ||
| [ < Kevesebb gépelés változókkal és függvényekkel ] | [ Fel: A sablonok kibővítése ] | [ A kimenet finomhangolása > ] | ||
3.4.5 Partitúra és szólamkották
In orchestral music, all notes are printed twice. Once in a part for the musicians, and once in a full score for the conductor. Variables can be used to avoid double work. The music is entered once, and stored in a variable. The contents of that variable is then used to generate both the part and the full score.
It is convenient to define the notes in a special file. For example, suppose that the file ‘horn-music.ly’ contains the following part of a horn/bassoon duo
hornNotes = \relative c {
  \time 2/4
  r4 f8 a cis4 f e d
}
Then, an individual part is made by putting the following in a file
\include "horn-music.ly"
\header {
  instrument = "Horn in F"
}

{
 \transpose f c' \hornNotes
}
The line
\include "horn-music.ly"
substitutes the contents of ‘horn-music.ly’ at this position in
the file, so hornNotes is defined afterwards. The command
\transpose f c' indicates that the argument, being
\hornNotes, should be transposed by a fifth upwards. Sounding
f is denoted by notated c', which corresponds with the
tuning of a normal French Horn in F. The transposition can be seen
in the following output
![[image of music]](d2/lily-4a2ea92e.png)
In ensemble pieces, one of the voices often does not play for many
measures. This is denoted by a special rest, the multi-measure
rest. It is entered with a capital R followed by a duration
(1 for a whole note, 2 for a half note,
etc.). By multiplying the
duration, longer rests can be constructed. For example, this rest
takes 3 measures in 2/4 time
R2*3
When printing the part, multi-rests must be condensed. This is done by setting a run-time variable
\set Score.skipBars = ##t
This command sets the property skipBars in the
Score context to true (##t). Prepending the rest and
this option to the music above, leads to the following result
![[image of music]](06/lily-2ace939b.png)
The score is made by combining all of the music together. Assuming
that the other voice is in bassoonNotes in the file
‘bassoon-music.ly’, a score is made with
\include "bassoon-music.ly"
\include "horn-music.ly"

<<
  \new Staff \hornNotes
  \new Staff \bassoonNotes
>>
leading to
![[image of music]](d6/lily-8e0bc52a.png)
| [ << Alapfogalmak ] | [Címoldal][Tartalom][Tárgymutató][ ? ] | [ Sablonok >> ] | ||
| [ < Partitúra és szólamkották ] | [ Fel: Top ] | [ A finomhangolás alapjai > ] | ||
4. A kimenet finomhangolása
| 4.1 A finomhangolás alapjai | ||
| 4.2 A belső működés referenciája | ||
| 4.3 Objektumok megjelenése | ||
| 4.4 Objektumok elhelyezése | ||
| 4.5 Objektumok ütközése | ||
| 4.6 További finomhangolás |
| [ << A kimenet finomhangolása ] | [Címoldal][Tartalom][Tárgymutató][ ? ] | [ Sablonok >> ] | ||
| [ < A kimenet finomhangolása ] | [ Fel: A kimenet finomhangolása ] | [ Bevezetés a finomhangolásba > ] | ||
4.1 A finomhangolás alapjai
| 4.1.1 Bevezetés a finomhangolásba | ||
| 4.1.2 Objektumok és interfészek | ||
| 4.1.3 Objektumok és tulajdonságok elnevezési konvenciói | ||
| 4.1.4 Finomhangolási módszerek |
| [ << A kimenet finomhangolása ] | [Címoldal][Tartalom][Tárgymutató][ ? ] | [ Sablonok >> ] | ||
| [ < A finomhangolás alapjai ] | [ Fel: A finomhangolás alapjai ] | [ Objektumok és interfészek > ] | ||
4.1.1 Bevezetés a finomhangolásba
Kontextusok és ábrázolók, as Contexts, Engravers, and the
4.1.2 Objektumok és interfészek
| [ << A kimenet finomhangolása ] | [Címoldal][Tartalom][Tárgymutató][ ? ] | [ Sablonok >> ] | ||
| [ < Objektumok és interfészek ] | [ Fel: A finomhangolás alapjai ] | [ Finomhangolási módszerek > ] | ||
4.1.3 Objektumok és tulajdonságok elnevezési konvenciói
Kontextusok és ábrázolók. Here for reference is a list
4.1.4 Finomhangolási módszerek
Ábrázolók hozzáadása és eltávolítása. We must now introduce some more
| [ << A kimenet finomhangolása ] | [Címoldal][Tartalom][Tárgymutató][ ? ] | [ Sablonok >> ] | ||
| [ < Finomhangolási módszerek ] | [ Fel: A kimenet finomhangolása ] | [ Elrendezési objektumok tulajdonságai > ] | ||
4.2 A belső működés referenciája
| 4.2.1 Elrendezési objektumok tulajdonságai | ||
| 4.2.2 Interfészek tulajdonságai | ||
| 4.2.3 Tulajdonságok típusai |
| [ << A kimenet finomhangolása ] | [Címoldal][Tartalom][Tárgymutató][ ? ] | [ Sablonok >> ] | ||
| [ < A belső működés referenciája ] | [ Fel: A belső működés referenciája ] | [ Interfészek tulajdonságai > ] | ||
4.2.1 Elrendezési objektumok tulajdonságai
A kívánt kontextus megkeresése
Felülírás csak egy alkalommal
Tulajdonság visszaállítása
| [ << A kimenet finomhangolása ] | [Címoldal][Tartalom][Tárgymutató][ ? ] | [ Sablonok >> ] | ||
| [ < Elrendezési objektumok tulajdonságai ] | [ Fel: A belső működés referenciája ] | [ Tulajdonságok típusai > ] | ||
4.2.2 Interfészek tulajdonságai
Kontextus megadása dalszöveg-beviteli módban
| [ << A kimenet finomhangolása ] | [Címoldal][Tartalom][Tárgymutató][ ? ] | [ Sablonok >> ] | ||
| [ < Interfészek tulajdonságai ] | [ Fel: A belső működés referenciája ] | [ Objektumok megjelenése > ] | ||
4.2.3 Tulajdonságok típusai
| [ << A kimenet finomhangolása ] | [Címoldal][Tartalom][Tárgymutató][ ? ] | [ Sablonok >> ] | ||
| [ < Tulajdonságok típusai ] | [ Fel: A kimenet finomhangolása ] | [ Objektumok láthatósága és színe > ] | ||
4.3 Objektumok megjelenése
| 4.3.1 Objektumok láthatósága és színe | ||
| 4.3.2 Objektumok mérete | ||
| 4.3.3 Objektumok hossza és vastagsága |
| [ << A kimenet finomhangolása ] | [Címoldal][Tartalom][Tárgymutató][ ? ] | [ Sablonok >> ] | ||
| [ < Objektumok megjelenése ] | [ Fel: Objektumok megjelenése ] | [ Objektumok mérete > ] | ||
4.3.1 Objektumok láthatósága és színe
stencil (láthatóság)
break-visibility (láthatóság sortörések körül)
transparent (átlátszóság)
color (szín)
| [ << A kimenet finomhangolása ] | [Címoldal][Tartalom][Tárgymutató][ ? ] | [ Sablonok >> ] | ||
| [ < Objektumok láthatósága és színe ] | [ Fel: Objektumok megjelenése ] | [ Objektumok hossza és vastagsága > ] | ||
4.3.2 Objektumok mérete
| [ << A kimenet finomhangolása ] | [Címoldal][Tartalom][Tárgymutató][ ? ] | [ Sablonok >> ] | ||
| [ < Objektumok mérete ] | [ Fel: Objektumok megjelenése ] | [ Objektumok elhelyezése > ] | ||
4.3.3 Objektumok hossza és vastagsága
| [ << A kimenet finomhangolása ] | [Címoldal][Tartalom][Tárgymutató][ ? ] | [ Sablonok >> ] | ||
| [ < Objektumok hossza és vastagsága ] | [ Fel: A kimenet finomhangolása ] | [ Automatikus viselkedés > ] | ||
4.4 Objektumok elhelyezése
| 4.4.1 Automatikus viselkedés | ||
| 4.4.2 Vonalrendszeren belüli objektumok | ||
| 4.4.3 Vonalrendszeren kívüli objektumok |
| [ << A kimenet finomhangolása ] | [Címoldal][Tartalom][Tárgymutató][ ? ] | [ Sablonok >> ] | ||
| [ < Objektumok elhelyezése ] | [ Fel: Objektumok elhelyezése ] | [ Vonalrendszeren belüli objektumok > ] | ||
4.4.1 Automatikus viselkedés
| [ << A kimenet finomhangolása ] | [Címoldal][Tartalom][Tárgymutató][ ? ] | [ Sablonok >> ] | ||
| [ < Automatikus viselkedés ] | [ Fel: Objektumok elhelyezése ] | [ > ] | ||
4.4.2 Vonalrendszeren belüli objektumok
Ujjrend
| [ << A kimenet finomhangolása ] | [Címoldal][Tartalom][Tárgymutató][ ? ] | [ Sablonok >> ] | ||
| [ < ] | [ Fel: Objektumok elhelyezése ] | [ Objektumok ütközése > ] | ||
4.4.3 Vonalrendszeren kívüli objektumok
A \textLengthOn parancs
Dinamika
Grobok méretezése
| [ << A kimenet finomhangolása ] | [Címoldal][Tartalom][Tárgymutató][ ? ] | [ Sablonok >> ] | ||
| [ < Vonalrendszeren kívüli objektumok ] | [ Fel: A kimenet finomhangolása ] | [ Objektumok mozgatása > ] | ||
4.5 Objektumok ütközése
| 4.5.1 Objektumok mozgatása | ||
| 4.5.2 Egymást átfedő jelek javítása | ||
| 4.5.3 Valós zenei példa |
| [ << A kimenet finomhangolása ] | [Címoldal][Tartalom][Tárgymutató][ ? ] | [ Sablonok >> ] | ||
| [ < Objektumok ütközése ] | [ Fel: Objektumok ütközése ] | [ Egymást átfedő jelek javítása > ] | ||
4.5.1 Objektumok mozgatása
Vonalrendszeren belüli objektumok. Szólamok kézi létrehozása) do not resolve the note
| [ << A kimenet finomhangolása ] | [Címoldal][Tartalom][Tárgymutató][ ? ] | [ Sablonok >> ] | ||
| [ < Objektumok mozgatása ] | [ Fel: Objektumok ütközése ] | [ Valós zenei példa > ] | ||
4.5.2 Egymást átfedő jelek javítása
padding (térköz) tulajdonság
left-padding (bal térköz) és right-padding (jobb térköz) tulajdonságok
staff-padding (kottasorok közötti térköz) tulajdonság
self-alignment-X (vízszintes igazítás) tulajdonság
staff-position (kottasor-pozíció) tulajdonság
extra-offset (extra eltolás) tulajdonság
positions (pozíciók) tulajdonság
force-hshift (kényszerített vízszintes eltolás) tulajdonság
| [ << A kimenet finomhangolása ] | [Címoldal][Tartalom][Tárgymutató][ ? ] | [ Sablonok >> ] | ||
| [ < Egymást átfedő jelek javítása ] | [ Fel: Objektumok ütközése ] | [ További finomhangolás > ] | ||
4.5.3 Valós zenei példa
| [ << A kimenet finomhangolása ] | [Címoldal][Tartalom][Tárgymutató][ ? ] | [ Sablonok >> ] | ||
| [ < Valós zenei példa ] | [ Fel: A kimenet finomhangolása ] | [ A finomhangolás más felhasználási módjai > ] | ||
4.6 További finomhangolás
| [ << A kimenet finomhangolása ] | [Címoldal][Tartalom][Tárgymutató][ ? ] | [ Sablonok >> ] | ||
| [ < További finomhangolás ] | [ Fel: További finomhangolás ] | [ Változók felhasználása a finomhangoláshoz > ] | ||
4.6.1 A finomhangolás más felhasználási módjai
Átkötés különböző szólamok hangjai között
Korona szimulációja MIDI-ben
| [ << A kimenet finomhangolása ] | [Címoldal][Tartalom][Tárgymutató][ ? ] | [ Sablonok >> ] | ||
| [ < A finomhangolás más felhasználási módjai ] | [ Fel: További finomhangolás ] | [ Stíluslapok > ] | ||
4.6.2 Változók felhasználása a finomhangoláshoz
| [ << A kimenet finomhangolása ] | [Címoldal][Tartalom][Tárgymutató][ ? ] | [ Sablonok >> ] | ||
| [ < Változók felhasználása a finomhangoláshoz ] | [ Fel: További finomhangolás ] | [ További információforrások > ] | ||
4.6.3 Stíluslapok
A kimenet finomhangolása, for details. But what if you have many Haladó finomhangolás Scheme-mel.
| [ << A kimenet finomhangolása ] | [Címoldal][Tartalom][Tárgymutató][ ? ] | [ Sablonok >> ] | ||
| [ < Stíluslapok ] | [ Fel: További finomhangolás ] | [ A lassabban feldolgozható finomhangolások elkerülése > ] | ||
4.6.4 További információforrások
| [ << A kimenet finomhangolása ] | [Címoldal][Tartalom][Tárgymutató][ ? ] | [ Sablonok >> ] | ||
| [ < További információforrások ] | [ Fel: További finomhangolás ] | [ Haladó finomhangolás Scheme-mel > ] | ||
4.6.5 A lassabban feldolgozható finomhangolások elkerülése
| [ << A kimenet finomhangolása ] | [Címoldal][Tartalom][Tárgymutató][ ? ] | [ Sablonok >> ] | ||
| [ < A lassabban feldolgozható finomhangolások elkerülése ] | [ Fel: További finomhangolás ] | [ Sablonok > ] | ||
4.6.6 Haladó finomhangolás Scheme-mel
| [ << A kimenet finomhangolása ] | [Címoldal][Tartalom][Tárgymutató][ ? ] | [ GNU Free Documentation License >> ] | ||
| [ < Haladó finomhangolás Scheme-mel ] | [ Fel: Top ] | [ Egy kottasor > ] | ||
A. Sablonok
| A.1 Egy kottasor | ||
| A.2 Zongorasablonok | ||
| A.3 Vonósnégyes | ||
| A.4 Kórus | ||
| A.5 Zenekari sablonok | ||
| A.6 Sablonok régizenéhez | ||
| A.7 Egyéb sablonok |
| [ << Sablonok ] | [Címoldal][Tartalom][Tárgymutató][ ? ] | [ GNU Free Documentation License >> ] | ||
| [ < Sablonok ] | [ Fel: Sablonok ] | [ > ] | ||
A.1 Egy kottasor
| [ << Sablonok ] | [Címoldal][Tartalom][Tárgymutató][ ? ] | [ GNU Free Documentation License >> ] | ||
| [ < Egy kottasor ] | [ Fel: Egy kottasor ] | [ > ] | ||
A.1.1 Csak hangok
| [ << Sablonok ] | [Címoldal][Tartalom][Tárgymutató][ ? ] | [ GNU Free Documentation License >> ] | ||
| [ < ] | [ Fel: Egy kottasor ] | [ > ] | ||
A.1.2 Hangok és dalszöveg
| [ << Sablonok ] | [Címoldal][Tartalom][Tárgymutató][ ? ] | [ GNU Free Documentation License >> ] | ||
| [ < ] | [ Fel: Egy kottasor ] | [ > ] | ||
A.1.3 Hangok és akkordok
| [ << Sablonok ] | [Címoldal][Tartalom][Tárgymutató][ ? ] | [ GNU Free Documentation License >> ] | ||
| [ < ] | [ Fel: Egy kottasor ] | [ Zongorasablonok > ] | ||
A.1.4 Hangok, dalszöveg és akkordok
| [ << Sablonok ] | [Címoldal][Tartalom][Tárgymutató][ ? ] | [ GNU Free Documentation License >> ] | ||
| [ < ] | [ Fel: Sablonok ] | [ > ] | ||
A.2 Zongorasablonok
| [ << Sablonok ] | [Címoldal][Tartalom][Tárgymutató][ ? ] | [ GNU Free Documentation License >> ] | ||
| [ < Zongorasablonok ] | [ Fel: Zongorasablonok ] | [ > ] | ||
A.2.1 Szólózongora
| [ << Sablonok ] | [Címoldal][Tartalom][Tárgymutató][ ? ] | [ GNU Free Documentation License >> ] | ||
| [ < ] | [ Fel: Zongorasablonok ] | [ > ] | ||
A.2.2 Zongora és dallam dalszöveggel
| [ << Sablonok ] | [Címoldal][Tartalom][Tárgymutató][ ? ] | [ GNU Free Documentation License >> ] | ||
| [ < ] | [ Fel: Zongorasablonok ] | [ > ] | ||
A.2.3 Zongora középre igazított dalszöveggel
| [ << Sablonok ] | [Címoldal][Tartalom][Tárgymutató][ ? ] | [ GNU Free Documentation License >> ] | ||
| [ < ] | [ Fel: Zongorasablonok ] | [ Vonósnégyes > ] | ||
A.2.4 Zongora középre igazított dinamikai jelzésekkel
| [ << Sablonok ] | [Címoldal][Tartalom][Tárgymutató][ ? ] | [ GNU Free Documentation License >> ] | ||
| [ < ] | [ Fel: Sablonok ] | [ > ] | ||
A.3 Vonósnégyes
| [ << Sablonok ] | [Címoldal][Tartalom][Tárgymutató][ ? ] | [ GNU Free Documentation License >> ] | ||
| [ < Vonósnégyes ] | [ Fel: Vonósnégyes ] | [ > ] | ||
A.3.1 Vonósnégyes
| [ << Sablonok ] | [Címoldal][Tartalom][Tárgymutató][ ? ] | [ GNU Free Documentation License >> ] | ||
| [ < ] | [ Fel: Vonósnégyes ] | [ Kórus > ] | ||
A.3.2 Vonósnégyes szólamkották
| [ << Sablonok ] | [Címoldal][Tartalom][Tárgymutató][ ? ] | [ GNU Free Documentation License >> ] | ||
| [ < ] | [ Fel: Sablonok ] | [ > ] | ||
A.4 Kórus
| [ << Sablonok ] | [Címoldal][Tartalom][Tárgymutató][ ? ] | [ GNU Free Documentation License >> ] | ||
| [ < Kórus ] | [ Fel: Kórus ] | [ > ] | ||
A.4.1 Négyszólamú vegyeskar
| [ << Sablonok ] | [Címoldal][Tartalom][Tárgymutató][ ? ] | [ GNU Free Documentation License >> ] | ||
| [ < ] | [ Fel: Kórus ] | [ > ] | ||
A.4.2 Négyszólamú vegyeskar és automatikus zongorakivonat
| [ << Sablonok ] | [Címoldal][Tartalom][Tárgymutató][ ? ] | [ GNU Free Documentation License >> ] | ||
| [ < ] | [ Fel: Kórus ] | [ Zenekari sablonok > ] | ||
A.4.3 Négyszólamú vegyeskar igazított kontextusokkal
| [ << Sablonok ] | [Címoldal][Tartalom][Tárgymutató][ ? ] | [ GNU Free Documentation License >> ] | ||
| [ < ] | [ Fel: Sablonok ] | [ > ] | ||
A.5 Zenekari sablonok
| [ << Sablonok ] | [Címoldal][Tartalom][Tárgymutató][ ? ] | [ GNU Free Documentation License >> ] | ||
| [ < Zenekari sablonok ] | [ Fel: Zenekari sablonok ] | [ Sablonok régizenéhez > ] | ||
A.5.1 Zenekar, kórus és zongora
| [ << Sablonok ] | [Címoldal][Tartalom][Tárgymutató][ ? ] | [ GNU Free Documentation License >> ] | ||
| [ < ] | [ Fel: Sablonok ] | [ > ] | ||
A.6 Sablonok régizenéhez
| [ << Sablonok ] | [Címoldal][Tartalom][Tárgymutató][ ? ] | [ GNU Free Documentation License >> ] | ||
| [ < Sablonok régizenéhez ] | [ Fel: Sablonok régizenéhez ] | [ > ] | ||
A.6.1 Menzurális notációval lejegyzett művek átírása
| [ << Sablonok ] | [Címoldal][Tartalom][Tárgymutató][ ? ] | [ GNU Free Documentation License >> ] | ||
| [ < ] | [ Fel: Sablonok régizenéhez ] | [ Egyéb sablonok > ] | ||
A.6.2 Gregorián tételek átírása
| [ << Sablonok ] | [Címoldal][Tartalom][Tárgymutató][ ? ] | [ GNU Free Documentation License >> ] | ||
| [ < ] | [ Fel: Sablonok ] | [ > ] | ||
A.7 Egyéb sablonok
| [ << Sablonok ] | [Címoldal][Tartalom][Tárgymutató][ ? ] | [ GNU Free Documentation License >> ] | ||
| [ < Egyéb sablonok ] | [ Fel: Egyéb sablonok ] | [ GNU Free Documentation License > ] | ||
A.7.1 Dzsesszegyüttes
| [ << Sablonok ] | [Címoldal][Tartalom][Tárgymutató][ ? ] | [ LilyPond tárgymutató >> ] | ||
| [ < ] | [ Fel: Top ] | [ LilyPond tárgymutató > ] | ||
B. GNU Free Documentation License
Version 1.3, 3 November 2008
Copyright © 2000, 2001, 2002, 2007, 2008 Free Software Foundation, Inc. http://fsf.org/ Everyone is permitted to copy and distribute verbatim copies of this license document, but changing it is not allowed. |
-
PREAMBLE
The purpose of this License is to make a manual, textbook, or other functional and useful document free in the sense of freedom: to assure everyone the effective freedom to copy and redistribute it, with or without modifying it, either commercially or noncommercially. Secondarily, this License preserves for the author and publisher a way to get credit for their work, while not being considered responsible for modifications made by others.
This License is a kind of “copyleft”, which means that derivative works of the document must themselves be free in the same sense. It complements the GNU General Public License, which is a copyleft license designed for free software.
We have designed this License in order to use it for manuals for free software, because free software needs free documentation: a free program should come with manuals providing the same freedoms that the software does. But this License is not limited to software manuals; it can be used for any textual work, regardless of subject matter or whether it is published as a printed book. We recommend this License principally for works whose purpose is instruction or reference.
-
APPLICABILITY AND DEFINITIONS
This License applies to any manual or other work, in any medium, that contains a notice placed by the copyright holder saying it can be distributed under the terms of this License. Such a notice grants a world-wide, royalty-free license, unlimited in duration, to use that work under the conditions stated herein. The “Document”, below, refers to any such manual or work. Any member of the public is a licensee, and is addressed as “you”. You accept the license if you copy, modify or distribute the work in a way requiring permission under copyright law.
A “Modified Version” of the Document means any work containing the Document or a portion of it, either copied verbatim, or with modifications and/or translated into another language.
A “Secondary Section” is a named appendix or a front-matter section of the Document that deals exclusively with the relationship of the publishers or authors of the Document to the Document’s overall subject (or to related matters) and contains nothing that could fall directly within that overall subject. (Thus, if the Document is in part a textbook of mathematics, a Secondary Section may not explain any mathematics.) The relationship could be a matter of historical connection with the subject or with related matters, or of legal, commercial, philosophical, ethical or political position regarding them.
The “Invariant Sections” are certain Secondary Sections whose titles are designated, as being those of Invariant Sections, in the notice that says that the Document is released under this License. If a section does not fit the above definition of Secondary then it is not allowed to be designated as Invariant. The Document may contain zero Invariant Sections. If the Document does not identify any Invariant Sections then there are none.
The “Cover Texts” are certain short passages of text that are listed, as Front-Cover Texts or Back-Cover Texts, in the notice that says that the Document is released under this License. A Front-Cover Text may be at most 5 words, and a Back-Cover Text may be at most 25 words.
A “Transparent” copy of the Document means a machine-readable copy, represented in a format whose specification is available to the general public, that is suitable for revising the document straightforwardly with generic text editors or (for images composed of pixels) generic paint programs or (for drawings) some widely available drawing editor, and that is suitable for input to text formatters or for automatic translation to a variety of formats suitable for input to text formatters. A copy made in an otherwise Transparent file format whose markup, or absence of markup, has been arranged to thwart or discourage subsequent modification by readers is not Transparent. An image format is not Transparent if used for any substantial amount of text. A copy that is not “Transparent” is called “Opaque”.
Examples of suitable formats for Transparent copies include plain ASCII without markup, Texinfo input format, LaTeX input format, SGML or XML using a publicly available DTD, and standard-conforming simple HTML, PostScript or PDF designed for human modification. Examples of transparent image formats include PNG, XCF and JPG. Opaque formats include proprietary formats that can be read and edited only by proprietary word processors, SGML or XML for which the DTD and/or processing tools are not generally available, and the machine-generated HTML, PostScript or PDF produced by some word processors for output purposes only.
The “Title Page” means, for a printed book, the title page itself, plus such following pages as are needed to hold, legibly, the material this License requires to appear in the title page. For works in formats which do not have any title page as such, “Title Page” means the text near the most prominent appearance of the work’s title, preceding the beginning of the body of the text.
The “publisher” means any person or entity that distributes copies of the Document to the public.
A section “Entitled XYZ” means a named subunit of the Document whose title either is precisely XYZ or contains XYZ in parentheses following text that translates XYZ in another language. (Here XYZ stands for a specific section name mentioned below, such as “Acknowledgements”, “Dedications”, “Endorsements”, or “History”.) To “Preserve the Title” of such a section when you modify the Document means that it remains a section “Entitled XYZ” according to this definition.
The Document may include Warranty Disclaimers next to the notice which states that this License applies to the Document. These Warranty Disclaimers are considered to be included by reference in this License, but only as regards disclaiming warranties: any other implication that these Warranty Disclaimers may have is void and has no effect on the meaning of this License.
-
VERBATIM COPYING
You may copy and distribute the Document in any medium, either commercially or noncommercially, provided that this License, the copyright notices, and the license notice saying this License applies to the Document are reproduced in all copies, and that you add no other conditions whatsoever to those of this License. You may not use technical measures to obstruct or control the reading or further copying of the copies you make or distribute. However, you may accept compensation in exchange for copies. If you distribute a large enough number of copies you must also follow the conditions in section 3.
You may also lend copies, under the same conditions stated above, and you may publicly display copies.
-
COPYING IN QUANTITY
If you publish printed copies (or copies in media that commonly have printed covers) of the Document, numbering more than 100, and the Document’s license notice requires Cover Texts, you must enclose the copies in covers that carry, clearly and legibly, all these Cover Texts: Front-Cover Texts on the front cover, and Back-Cover Texts on the back cover. Both covers must also clearly and legibly identify you as the publisher of these copies. The front cover must present the full title with all words of the title equally prominent and visible. You may add other material on the covers in addition. Copying with changes limited to the covers, as long as they preserve the title of the Document and satisfy these conditions, can be treated as verbatim copying in other respects.
If the required texts for either cover are too voluminous to fit legibly, you should put the first ones listed (as many as fit reasonably) on the actual cover, and continue the rest onto adjacent pages.
If you publish or distribute Opaque copies of the Document numbering more than 100, you must either include a machine-readable Transparent copy along with each Opaque copy, or state in or with each Opaque copy a computer-network location from which the general network-using public has access to download using public-standard network protocols a complete Transparent copy of the Document, free of added material. If you use the latter option, you must take reasonably prudent steps, when you begin distribution of Opaque copies in quantity, to ensure that this Transparent copy will remain thus accessible at the stated location until at least one year after the last time you distribute an Opaque copy (directly or through your agents or retailers) of that edition to the public.
It is requested, but not required, that you contact the authors of the Document well before redistributing any large number of copies, to give them a chance to provide you with an updated version of the Document.
-
MODIFICATIONS
You may copy and distribute a Modified Version of the Document under the conditions of sections 2 and 3 above, provided that you release the Modified Version under precisely this License, with the Modified Version filling the role of the Document, thus licensing distribution and modification of the Modified Version to whoever possesses a copy of it. In addition, you must do these things in the Modified Version:
- Use in the Title Page (and on the covers, if any) a title distinct from that of the Document, and from those of previous versions (which should, if there were any, be listed in the History section of the Document). You may use the same title as a previous version if the original publisher of that version gives permission.
- List on the Title Page, as authors, one or more persons or entities responsible for authorship of the modifications in the Modified Version, together with at least five of the principal authors of the Document (all of its principal authors, if it has fewer than five), unless they release you from this requirement.
- State on the Title page the name of the publisher of the Modified Version, as the publisher.
- Preserve all the copyright notices of the Document.
- Add an appropriate copyright notice for your modifications adjacent to the other copyright notices.
- Include, immediately after the copyright notices, a license notice giving the public permission to use the Modified Version under the terms of this License, in the form shown in the Addendum below.
- Preserve in that license notice the full lists of Invariant Sections and required Cover Texts given in the Document’s license notice.
- Include an unaltered copy of this License.
- Preserve the section Entitled “History”, Preserve its Title, and add to it an item stating at least the title, year, new authors, and publisher of the Modified Version as given on the Title Page. If there is no section Entitled “History” in the Document, create one stating the title, year, authors, and publisher of the Document as given on its Title Page, then add an item describing the Modified Version as stated in the previous sentence.
- Preserve the network location, if any, given in the Document for public access to a Transparent copy of the Document, and likewise the network locations given in the Document for previous versions it was based on. These may be placed in the “History” section. You may omit a network location for a work that was published at least four years before the Document itself, or if the original publisher of the version it refers to gives permission.
- For any section Entitled “Acknowledgements” or “Dedications”, Preserve the Title of the section, and preserve in the section all the substance and tone of each of the contributor acknowledgements and/or dedications given therein.
- Preserve all the Invariant Sections of the Document, unaltered in their text and in their titles. Section numbers or the equivalent are not considered part of the section titles.
- Delete any section Entitled “Endorsements”. Such a section may not be included in the Modified Version.
- Do not retitle any existing section to be Entitled “Endorsements” or to conflict in title with any Invariant Section.
- Preserve any Warranty Disclaimers.
If the Modified Version includes new front-matter sections or appendices that qualify as Secondary Sections and contain no material copied from the Document, you may at your option designate some or all of these sections as invariant. To do this, add their titles to the list of Invariant Sections in the Modified Version’s license notice. These titles must be distinct from any other section titles.
You may add a section Entitled “Endorsements”, provided it contains nothing but endorsements of your Modified Version by various parties—for example, statements of peer review or that the text has been approved by an organization as the authoritative definition of a standard.
You may add a passage of up to five words as a Front-Cover Text, and a passage of up to 25 words as a Back-Cover Text, to the end of the list of Cover Texts in the Modified Version. Only one passage of Front-Cover Text and one of Back-Cover Text may be added by (or through arrangements made by) any one entity. If the Document already includes a cover text for the same cover, previously added by you or by arrangement made by the same entity you are acting on behalf of, you may not add another; but you may replace the old one, on explicit permission from the previous publisher that added the old one.
The author(s) and publisher(s) of the Document do not by this License give permission to use their names for publicity for or to assert or imply endorsement of any Modified Version.
-
COMBINING DOCUMENTS
You may combine the Document with other documents released under this License, under the terms defined in section 4 above for modified versions, provided that you include in the combination all of the Invariant Sections of all of the original documents, unmodified, and list them all as Invariant Sections of your combined work in its license notice, and that you preserve all their Warranty Disclaimers.
The combined work need only contain one copy of this License, and multiple identical Invariant Sections may be replaced with a single copy. If there are multiple Invariant Sections with the same name but different contents, make the title of each such section unique by adding at the end of it, in parentheses, the name of the original author or publisher of that section if known, or else a unique number. Make the same adjustment to the section titles in the list of Invariant Sections in the license notice of the combined work.
In the combination, you must combine any sections Entitled “History” in the various original documents, forming one section Entitled “History”; likewise combine any sections Entitled “Acknowledgements”, and any sections Entitled “Dedications”. You must delete all sections Entitled “Endorsements.”
-
COLLECTIONS OF DOCUMENTS
You may make a collection consisting of the Document and other documents released under this License, and replace the individual copies of this License in the various documents with a single copy that is included in the collection, provided that you follow the rules of this License for verbatim copying of each of the documents in all other respects.
You may extract a single document from such a collection, and distribute it individually under this License, provided you insert a copy of this License into the extracted document, and follow this License in all other respects regarding verbatim copying of that document.
-
AGGREGATION WITH INDEPENDENT WORKS
A compilation of the Document or its derivatives with other separate and independent documents or works, in or on a volume of a storage or distribution medium, is called an “aggregate” if the copyright resulting from the compilation is not used to limit the legal rights of the compilation’s users beyond what the individual works permit. When the Document is included in an aggregate, this License does not apply to the other works in the aggregate which are not themselves derivative works of the Document.
If the Cover Text requirement of section 3 is applicable to these copies of the Document, then if the Document is less than one half of the entire aggregate, the Document’s Cover Texts may be placed on covers that bracket the Document within the aggregate, or the electronic equivalent of covers if the Document is in electronic form. Otherwise they must appear on printed covers that bracket the whole aggregate.
-
TRANSLATION
Translation is considered a kind of modification, so you may distribute translations of the Document under the terms of section 4. Replacing Invariant Sections with translations requires special permission from their copyright holders, but you may include translations of some or all Invariant Sections in addition to the original versions of these Invariant Sections. You may include a translation of this License, and all the license notices in the Document, and any Warranty Disclaimers, provided that you also include the original English version of this License and the original versions of those notices and disclaimers. In case of a disagreement between the translation and the original version of this License or a notice or disclaimer, the original version will prevail.
If a section in the Document is Entitled “Acknowledgements”, “Dedications”, or “History”, the requirement (section 4) to Preserve its Title (section 1) will typically require changing the actual title.
-
TERMINATION
You may not copy, modify, sublicense, or distribute the Document except as expressly provided under this License. Any attempt otherwise to copy, modify, sublicense, or distribute it is void, and will automatically terminate your rights under this License.
However, if you cease all violation of this License, then your license from a particular copyright holder is reinstated (a) provisionally, unless and until the copyright holder explicitly and finally terminates your license, and (b) permanently, if the copyright holder fails to notify you of the violation by some reasonable means prior to 60 days after the cessation.
Moreover, your license from a particular copyright holder is reinstated permanently if the copyright holder notifies you of the violation by some reasonable means, this is the first time you have received notice of violation of this License (for any work) from that copyright holder, and you cure the violation prior to 30 days after your receipt of the notice.
Termination of your rights under this section does not terminate the licenses of parties who have received copies or rights from you under this License. If your rights have been terminated and not permanently reinstated, receipt of a copy of some or all of the same material does not give you any rights to use it.
-
FUTURE REVISIONS OF THIS LICENSE
The Free Software Foundation may publish new, revised versions of the GNU Free Documentation License from time to time. Such new versions will be similar in spirit to the present version, but may differ in detail to address new problems or concerns. See http://www.gnu.org/copyleft/.
Each version of the License is given a distinguishing version number. If the Document specifies that a particular numbered version of this License “or any later version” applies to it, you have the option of following the terms and conditions either of that specified version or of any later version that has been published (not as a draft) by the Free Software Foundation. If the Document does not specify a version number of this License, you may choose any version ever published (not as a draft) by the Free Software Foundation. If the Document specifies that a proxy can decide which future versions of this License can be used, that proxy’s public statement of acceptance of a version permanently authorizes you to choose that version for the Document.
-
RELICENSING
“Massive Multiauthor Collaboration Site” (or “MMC Site”) means any World Wide Web server that publishes copyrightable works and also provides prominent facilities for anybody to edit those works. A public wiki that anybody can edit is an example of such a server. A “Massive Multiauthor Collaboration” (or “MMC”) contained in the site means any set of copyrightable works thus published on the MMC site.
“CC-BY-SA” means the Creative Commons Attribution-Share Alike 3.0 license published by Creative Commons Corporation, a not-for-profit corporation with a principal place of business in San Francisco, California, as well as future copyleft versions of that license published by that same organization.
“Incorporate” means to publish or republish a Document, in whole or in part, as part of another Document.
An MMC is “eligible for relicensing” if it is licensed under this License, and if all works that were first published under this License somewhere other than this MMC, and subsequently incorporated in whole or in part into the MMC, (1) had no cover texts or invariant sections, and (2) were thus incorporated prior to November 1, 2008.
The operator of an MMC Site may republish an MMC contained in the site under CC-BY-SA on the same site at any time before August 1, 2009, provided the MMC is eligible for relicensing.
ADDENDUM: How to use this License for your documents
To use this License in a document you have written, include a copy of the License in the document and put the following copyright and license notices just after the title page:
Copyright (C) year your name. Permission is granted to copy, distribute and/or modify this document under the terms of the GNU Free Documentation License, Version 1.3 or any later version published by the Free Software Foundation; with no Invariant Sections, no Front-Cover Texts, and no Back-Cover Texts. A copy of the license is included in the section entitled ``GNU Free Documentation License''. |
If you have Invariant Sections, Front-Cover Texts and Back-Cover Texts, replace the “with…Texts.” line with this:
    with the Invariant Sections being list their titles, with
    the Front-Cover Texts being list, and with the Back-Cover Texts
    being list.
|
If you have Invariant Sections without Cover Texts, or some other combination of the three, merge those two alternatives to suit the situation.
If your document contains nontrivial examples of program code, we recommend releasing these examples in parallel under your choice of free software license, such as the GNU General Public License, to permit their use in free software.
| [ << GNU Free Documentation License ] | [Címoldal][Tartalom][Tárgymutató][ ? ] | [ >> ] | ||
| [ < GNU Free Documentation License ] | [ Fel: Top ] | [ > ] | ||
C. LilyPond tárgymutató
| Ugorj ide: | !
%
'
(
,
.
<
>
[
\
]
^
_
~
Á
É
Ö
Ú
Ü
A B C D E F G H I K L M N O P Q R S T U V W Z |
|---|
| Ugorj ide: | !
%
'
(
,
.
<
>
[
\
]
^
_
~
Á
É
Ö
Ú
Ü
A B C D E F G H I K L M N O P Q R S T U V W Z |
|---|
| [Címoldal][Tartalom][Tárgymutató][ ? ] |
Tartalomjegyzék
- 1. Első lecke
- 2. Elemi kottaírás
- 3. Alapfogalmak
- 4. A kimenet finomhangolása
- A. Sablonok
- B. GNU Free Documentation License
- C. LilyPond tárgymutató
| [Címoldal][Tartalom][Tárgymutató][ ? ] |
A navigációs panel használata
This document was generated by Sawada on január 3, 2011 using texi2html 1.82.
A navigációs panelen levő gombok jelentése a következő:
| Gomb | Név | Cél | 1.2.3-ból ide jutunk |
|---|---|---|---|
| [] | |||
| [ << ] | Visszaugrás | Fejezet eleje vagy előző fejezet | 1 |
| [] | |||
| [Címoldal] | Címoldal | Dokumentum címoldala | |
| [Tartalom] | Tartalom | Tartalomjegyzék | |
| [Tárgymutató] | Tárgymutató | Tárgymutató | |
| [ ? ] | Súgó | Segítség a navigációhoz | |
| [] | |||
| [ >> ] | Előreugrás | Következő fejezet | 2 |
| [] | |||
| [] | |||
| [ < ] | Vissza | Előző szakasz az olvasási sorrendben | 1.2.2 |
| [] | |||
| [Fel] | Fel | Szülő szakasz | 1.2 |
| [] | |||
| [ > ] | Előre | Következő szakasz az olvasási sorrendben | 1.2.4 |
Példánkban az aktuális pozíció az 1.2.3 alalszakasz egy olyan dokumentumban, melynek szerkezete a következő:
- 1. szakasz
- 1.1 alszakasz
- ...
- 1.2 alszakasz
- 1.2.1 alalszakasz
- 1.2.2 alalszakasz
- 1.2.3 alalszakasz <== Aktuális pozíció
- 1.2.4 alalszakasz
- 1.3 alszakasz
- ...
- 1.4 alszakasz
- 1.1 alszakasz
Más nyelvek: English, deutsch, español, français, italiano, 日本語, nederlands.